February 2009
TRADERS' TIPS
Here is this month's selection of Traders' Tips, contributed by various developers of technical analysis software to help readers more easily implement some of the strategies presented in this and other issues.
Other code appearing in articles in this issue is posted in the Subscriber Area of our website at https://technical.traders.com/sub/sublogin.asp. Login requires your last name and subscription number (from mailing label). Once logged in, scroll down to beneath the "Optimized trading systems" area until you see "Code from articles." From there, code can be copied and pasted into the appropriate technical analysis program so that no retyping of code is required for subscribers.
You can copy these formulas and programs for easy use in your spreadsheet or analysis software. Simply "select" the desired text by highlighting as you would in any word processing program, then use your standard key command for copy or choose "copy" from the browser menu. The copied text can then be "pasted" into any open spreadsheet or other software by selecting an insertion point and executing a paste command. By toggling back and forth between an application window and the open web page, data can be transferred with ease.
This month's tips include formulas and programs for:
- TRADESTATION: TRADING THE AUSSIE
- eSIGNAL: TRADING THE AUSSIE
- WEALTH-LAB: TRADING THE AUSSIE
- AMIBROKER: TRADING THE AUSSIE
- TD AMERITRADE: BOLLINGER BAND DIVERGENCE INDICATOR
- NEUROSHELL: TRADING THE AUSSIE
- AIQ: TRADING THE AUSSIE
- TRADERSTUDIO: TRADING THE AUSSIE
- STRATASEARCH: TRADING THE AUSSIE
- TRADE NAVIGATOR: TRADING THE AUSSIE
- NEOTICKER: TRADING THE AUSSIE
- NINJATRADER: MULTIPLE INSTRUMENTS IN A STRATEGY
- TRADE IDEAS: FINDING OVEREXTENDED MOVES IN PRICE
- METASTOCK: TRADING THE AUSSIE (Katsanos Article Code)
TRADESTATION: TRADING THE AUSSIE
Markos Katsanos' article in this issue, "Trading The Aussie," provides system rules for using intermarket signals to trade the Australian dollar/US dollar currency pair. Signals are generated using six different datasets, including the Australian dollar, Crb Index, Phlx Gold and Silver Sector Index, the 90-day Aussie bank bill futures, and 10-year Aussie Treasury.
So that we can replicate his results, the author has provided data for the Aussie Bank Bill and Treasury symbols. The two Aussie datasets will be available with the code. They can be included in your studies by using the third-party data import feature within the Symbol-Lookup option.
To download the EasyLanguage code for this study, go to the TradeStation and EasyLanguage Support Forum (https://www.tradestation.com/Discussions/forum.aspx?Forum_ID=213). Search for the file "IntermarketDiv.eld."
This article is for informational purposes. No type of trading or investment recommendation, advice, or strategy is being made, given, or in any manner provided by TradeStation Securities or its affiliates.

FIGURE 1: TRADESTATION, INTERMARKET BOLLINGER BANDS DIVERGENCE STRATEGY. Intermarket BB Div strategy trades are displayed in the top pane. The intermarket BB Div indicator is displayed in the lower pane. Five additional datasets are included in the calculations that exist within the chart, but are hidden to simplify the display.
   Indicator: Intermarket BB Div

inputs:
	D1( 30 ),
	Security1( Close data1 ),
	Security2( Close data2) ;
variables:
	Security1Bol(0),
	Security2Bol(0),
	Diverg(0);

Security1Bol = 1 + ((Security1 - Average(Security1,D1)
               + 2* StdDev(Security1,D1))/(4*StdDev(Security1, D1) + .0001));
Security2Bol = 1 + ((Security2 - Average( Security2, D1)
               + 2*StdDev(Security2,D1))/(4*StdDev(Security2,D1) + .0001));
DIVERG =(Security2Bol-Security1Bol)/Security1Bol*100;

Plot1( DIVERG,"Divergence" )


Strategy:  Intermarket BB Div

inputs:
	BollingerLength( 30 ),
	Security2Price( Close Data2 ), { XAU }
	Security3Price( Close Data3 ), { CRD }
	Security4Price( 100 - Close Data4 ), { YTCc1 }
	Security5Price( 100 - Close Data5 ), { YBAc1 }
	Security6Price( Close Data6 ) ; { EURJPY }

variables:
	SDevSec1( 0 ),
	SDevSec2( 0 ),
	SDevSec3( 0 ),
	Security1Bollinger( 0 ),
	Security2Bollinger( 0 ),
	Security3Bollinger( 0 ),
	Divergence1( 0 ),
	Divergence2( 0 ),
	Divergence3( 0 ),
	MACDValue( 0 ),
	MACDAvg( 0 ),
	ROC2Sec1( 0 ),
	ROC1Sec2( 0 ),
	LL4( 0 ),
	HH4( 0 ),
	S4_40MA( 0 ),
	S5_40MA( 0 ),
	S6_40MA( 0 ),
	MA15( 0 ),
	MA50( 0 ),
	P( SquareRoot( ( BollingerLength - 1 )
		/ BollingerLength ) ),
	LECondition1( false ),
	LECondition2( false ),
	LECondition3( false ),
	LXCondition1( false ),
	LXCondition2( false ),
	LXCondition3( false ),
	SECondition1( false ),
	SECondition2( false ),
	SECondition3( false ),
	SXCondition1( false ),
	SXCondition2( false ) ;

SDevSec1 = StdDev( Close, BollingerLength ) * P ;
SDevSec2 = StdDev( Security2Price, BollingerLength ) * P ;
SDevSec3 = StdDev( Security3Price, BollingerLength ) * P ;

Security1Bollinger = 1 + ( ( Close - Average( Close,
 BollingerLength ) + 2 * SDevSec1 ) / ( 4 * SDevSec1 +
 0.0001 ) ) ;

Security2Bollinger = 1 + ( ( Security2Price - Average(
 Security2Price, BollingerLength ) + 2 * SDevSec2 ) /
 ( 4 * SDevSec2 + 0.0001 ) ) ;

Security3Bollinger = 1 + ( ( Security3Price - Average(
 Security3Price, BollingerLength ) + 2 * SDevSec3 )	/
 ( 4 * SDevSec3 + 0.0001 ) ) ;

Divergence2 = ( Security2Bollinger -
 Security1Bollinger ) / Security1Bollinger * 100 ;

Divergence3 = ( Security3Bollinger -
 Security1Bollinger ) / Security1Bollinger * 100 ;

Divergence1 = Maxlist( Divergence2, Divergence3 ) ;

MACDValue = MACD( Close, 12, 26 ) ;
MACDAvg = XAverage( MACDValue, 9 ) ;
ROC2Sec1 = RateOfChange( Close, 2 ) ;
ROC1Sec2 = RateOfChange( Security2Price, 1 ) ;
LL4 = Lowest( Low, 4 ) ;
HH4 = Highest( High, 4 ) ;
S4_40MA = Average( Security4Price, 40 ) ;
S5_40MA = Average( Security5Price, 40 ) ;
S6_40MA = Average( Security6Price, 40 ) ;
MA15 = Average( Close, 15 ) ;
MA50 = Average( Close, 50 ) ;

{ Long entry conditions }
LECondition1 = Highest( Divergence1, 3 ) > 10
	and Divergence1 < Divergence1[1]
	and ROC2Sec1 > 0
	and Close > 1.007 * LL4
	and ( S4_40MA > S4_40MA[1] or S5_40MA >
	 S5_40MA[1] ) ;

LECondition2 = Divergence1 > 40
	and Divergence2 + Divergence3 > 80
	and Divergence1 < Divergence1[1]
	and Close > Close[1]
	and Close > 1.007 * LL4 ;

LECondition3 = MA15 crosses over MA50 and S5_40MA >
 S5_40MA[1] ;


{ Long exit conditions }
LXCondition1 = MACDAvg crosses over MACDValue and
 Highest( MACDValue, 5 ) > Highest( MACDValue[5], 50 ) ;

LXCondition2 = Divergence1 < -30
	and ( ROC1Sec2 < -0.5 or RateOfChange(
	Security3Price, 1 ) < -0.5 )
	and Close < 0.993 * HH4 ;

LXCondition3 = Divergence1 < 0
	and RateOfChange( Security6Price, 2 ) < -1
	and Close < 0.993 * HH4
	and S6_40MA < S6_40MA[1] ;


{ Short entry conditons }
SECondition1 = ( Lowest( Divergence1, 3 ) < -10
	and Divergence1 > Divergence1[1]
	and ROC2Sec1 < 0
	and Close < 0.993 * HH4
	and ( S4_40MA < S4_40MA[1]
	or S5_40MA < S5_40MA[1] ) ) ;

SECondition2 = Divergence1 < -20
	and Divergence2 + Divergence3 < -40
	and Divergence1 > Divergence1[1]
	and Close < Close[1]
	and Close < 0.993 * HH4 ;

SECondition3 = MA50 crosses over MA15 and S5_40MA <
 S5_40MA[1] ;

{ Short exit conditions }
SXCondition1 = MACDValue crosses over MACDAvg and
 Lowest( MACDValue, 5 ) < Lowest( MACDValue[5], 50 ) ;

SXCondition2 = Divergence1 > 30
	and ( ROC1Sec2 > 0.5 or
	RateOfChange( Security3Price, 1 ) > 0.5 )
	and Close > 1.007 * HH4 ;


{ Strategy orders }
if LECondition1	or LECondition2 or LECondition3 then
	Buy next bar market ;

if LXCondition1	or LXCondition2 or LXCondition3 then
	Sell next bar at market ;

if SECondition1	or SECondition2 or SECondition3 then
	SellShort next bar at market ;

if SXCondition1	or SXCondition2 then
	BuyToCover next bar at market ;
BACK TO LIST
eSIGNAL: TRADING THE AUSSIE
For this month's Traders' Tip, we�ve provided the formulas "BB_Divergence.efs" and "BB_Divergence_System.efs," based on the formula code from Markos Katsanos' article in this issue, "Trading the Aussie."
The BB_Divergence.efs formula simply plots the BB divergence indicator and contains formula parameters that may be configured through the Edit Studies option to change the symbol, period length and formatting for the line.
�The BB_Divergence_System.efs contains the BB divergence backtesting system and is configured for daily or higher intervals. The study contains formula parameters to configure the symbols and period length used for the strategy.
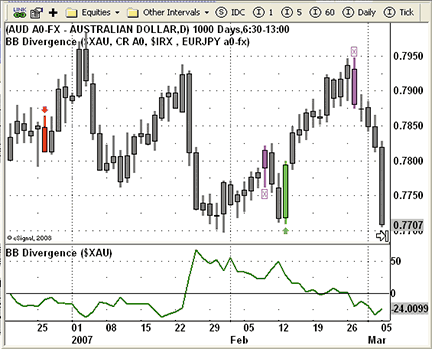
FIGURE 2: eSIGNAL, BOLLINGER BAND DIVERGENCE SYSTEM. The price pane is displaying the divergence system results where entry trades are highlighted as red or lime bars. The closing trades are highlighted as magenta bars. The bottom pane is displaying the BB divergence indicator.
To discuss this study or download a complete copy of the formula code, please visit the Efs Library Discussion Board forum under the Forums link at www.esignalcentral.com or visit our Efs KnowledgeBase at www.esignalcentral.com/support/kb/efs/. The eSignal formula scripts (Efs) are included below for copying and pasting.
eSignal BB_Divergence:
/*********************************
Provided By:
eSignal (Copyright c eSignal), a division of Interactive Data
Corporation. 2008. All rights reserved. This sample eSignal
Formula Script (EFS) is for educational purposes only and
may be modified and saved under a new file name. eSignal
is not responsible for the functionality once modified. eSignal
reserves the right to modify and overwrite this EFS file with
each new release.
Description:
Trading The Aussie, by Markos Katsanos
Version: 1.0 12/05/2008
Notes:
The related article is copyrighted material. If you are not
a subscriber of Stocks & Commodities, please visit
www.traders.com.
Formula Parameters: Default:
Symbol $XAU
Line Color Green
Length 30
Line Thickness 2
Display Cursor Labels True
**********************************/
var fpArray = new Array();
var bInit = false;
var bVersion = null;
function preMain() {
setPriceStudy(false);
setShowCursorLabel(false);
setShowTitleParameters( false );
setStudyTitle("BB Divergence");
setCursorLabelName("BB Divergence", 0);
setDefaultBarFgColor(Color.red, 0);
setPlotType(PLOTTYPE_LINE, 0);
setDefaultBarThickness(2, 0);
addBand(0, PS_SOLID, 1, Color.black);
askForInput();
var x=0;
fpArray[x] = new FunctionParameter("LineColor", FunctionParameter.COLOR);
with(fpArray[x++]){
setName("Line Color");
setDefault(Color.green);
}
fpArray[x] = new FunctionParameter("ViewValue", FunctionParameter.BOOLEAN);
with(fpArray[x++]){
setName("Display Cursor Labels");
setDefault(true);
}
fpArray[x] = new FunctionParameter("Length", FunctionParameter.NUMBER);
with(fpArray[x++]){
setLowerLimit(1);
setUpperLimit(200);
setDefault(30);
}
fpArray[x] = new FunctionParameter("Thickness", FunctionParameter.NUMBER);
with(fpArray[x++]){
setName("Line Thickness");
setLowerLimit(1);
setDefault(2);
}
fpArray[x] = new FunctionParameter("InSymbol", FunctionParameter.STRING);
with(fpArray[x++]){
setName("Symbol");
setDefault("$XAU");
}
}
var xSEC2 = null;
var xMovSeg2 = null;
var xStdevSeg2 = null;
var xMA = null;
var xStdev = null;
function main(InSymbol, Length, Thickness, LineColor, ViewValue) {
var nsec1BOL = 0;
var nsec2BOL = 0;
var nDIVERG = 0;
if (bVersion == null) bVersion = verify();
if (bVersion == false) return;
if ( bInit == false ) {
setDefaultBarFgColor(LineColor, 0);
setDefaultBarThickness(Thickness, 0);
setShowCursorLabel(ViewValue);
setStudyTitle("BB Divergence ("+InSymbol+")");
xSEC2 = close(sym(InSymbol+","+getInterval()));
xMovSeg2 = sma(Length, xSEC2);
xStdevSeg2 = efsInternal("StdDev", Length, xSEC2);
xMA = sma(Length);
xStdev = efsInternal("StdDev", Length, close());
bInit = true;
}
if (getCurrentBarCount() < Length) return;
nsec1BOL = 1 + ((close(0) - xMA.getValue(0)
+ 2 * xStdev.getValue(0)) / (4 * xStdev.getValue(0) + 0.0001));
nsec2BOL = 1 + ((xSEC2.getValue(0) - xMovSeg2.getValue(0)
+ 2 * xStdevSeg2.getValue(0)) / (4 * xStdevSeg2.getValue(0) + 0.0001));
nDIVERG = (nsec2BOL - nsec1BOL) / nsec1BOL * 100;
if (nDIVERG != null)
return nDIVERG;
}
function StdDev(Period, DataArray) {
var sum = 0;
var avg = 0;
var res = 0;
if (getCurrentBarCount() < Period) return;
for (var barsBack = Period-1; barsBack >= 0; barsBack--) {
sum += DataArray.getValue(-barsBack);
}
avg = sum / Period;
sum = 0;
for (var barsBack = Period - 1; barsBack >= 0; barsBack--) {
sum += (DataArray.getValue(-barsBack) - avg) * (DataArray.getValue(-barsBack) - avg);
}
res = Math.sqrt(sum / Period);
return res;
}
function verify() {
var b = false;
if (getBuildNumber() < 779) {
drawTextAbsolute(5, 35, "This study requires version 8.0 or later.",
Color.white, Color.blue, Text.RELATIVETOBOTTOM|Text.RELATIVETOLEFT|Text.BOLD|Text.LEFT,
null, 13, "error");
drawTextAbsolute(5, 20, "Click HERE to upgrade.@URL=https://www.esignal.com/download/default.asp",
Color.white, Color.blue, Text.RELATIVETOBOTTOM|Text.RELATIVETOLEFT|Text.BOLD|Text.LEFT,
null, 13, "upgrade");
return b;
} else {
b = true;
}
return b;
}
eSignal BB_Divergence_System:
/*********************************
Provided By:
eSignal (Copyright c eSignal), a division of Interactive Data
Corporation. 2008. All rights reserved. This sample eSignal
Formula Script (EFS) is for educational purposes only and
may be modified and saved under a new file name. eSignal
is not responsible for the functionality once modified. eSignal
reserves the right to modify and overwrite this EFS file with
each new release.
Description:
Trading The Aussie, by Markos Katsanos
Version: 1.0 12/11/2008
Notes:
The related article is copyrighted material. If you are not
a subscriber of Stocks & Commodities, please visit
www.traders.com.
Formula Parameters: Default:
XAU $XAU
CRB CR A0
YBA $IRX
EURJPY EURJPY a0-fx
Length 30
**********************************/
var fpArray = new Array();
var bInit = false;
var bVersion = null;
var bBail = false;
function preMain() {
setPriceStudy(true);
setShowCursorLabel(false);
setShowTitleParameters( false );
setStudyTitle("BB Divergence");
setColorPriceBars(true);
setDefaultPriceBarColor(Color.grey);
askForInput();
var x=0;
fpArray[x] = new FunctionParameter("Length", FunctionParameter.NUMBER);
with(fpArray[x++]){
setLowerLimit(1);
setUpperLimit(200);
setDefault(30);
}
fpArray[x] = new FunctionParameter("XAU", FunctionParameter.STRING);
with(fpArray[x++]){
setName("XAU");
setDefault("$XAU");
}
fpArray[x] = new FunctionParameter("CRB", FunctionParameter.STRING);
with(fpArray[x++]){
setName("CRB");
setDefault("CR A0");
}
fpArray[x] = new FunctionParameter("YBA", FunctionParameter.STRING);
with(fpArray[x++]){
setName("YBA");
setDefault("$IRX");
}
fpArray[x] = new FunctionParameter("EURJPY", FunctionParameter.STRING);
with(fpArray[x++]){
setName("EURJPY");
setDefault("EURJPY a0-fx");
}
}
var xCRB = null;
var xYBA = null;
var xXAU = null;
var xEURJPY = null;
var xMovEURJPY = null;
var xROCEURJPY = null;
var xMovXAU = null;
var xStdevXAU = null;
var xROCXAU = null;
var xMovCRB = null;
var xStdevCRB = null;
var xROCCRB = null;
var xMovYBA = null;
var xMA = null;
var xMA15 = null;
var xMA50 = null;
var xStdev = null;
var aDIV1 = new Array(4);
var nDIV1 = 0;
var xROC = null;
var xLLV = null;
var xHHV = null;
var xMACD = null;
var xMACD_MA = null;
var xMACDLL5 = null;
var xMACDLL50 = null;
var xMACDHH5 = null;
var xMACDHH50 = null;
function main(XAU, CRB, YBA, EURJPY, Length) {
var nState = getBarState();
var nsec1BOL = 0;
var nsec2BOL = 0;
var nsec3BOL = 0;
var nDIV2 = 0;
var nDIV3 = 0;
if (bVersion == null) bVersion = verify();
if (bVersion == false) return;
if ( bBail == true ) {
return;
}
if (isIntraday()) {
setStudyTitle("Sorry. This script doesn�t work on intraday charts.");
bBail = true;
return;
}
if ( bInit == false ) {
setStudyTitle("BB Divergence ("+XAU+", "+CRB+", "+YBA+" , "+EURJPY+")");
xCRB = close(sym(CRB));
xYBA = close(sym(YBA));
xXAU = close(sym(XAU));
xEURJPY = close(sym(EURJPY));
xMovEURJPY = ema(40, xEURJPY);
xROCEURJPY = roc(2, xEURJPY);
xMA = sma(Length);
xMA15 = sma(15);
xMA50 = sma(50);
xStdev = efsInternal("StdDev", Length, close());
xMovXAU = sma(Length, xXAU);
xROCXAU = roc(1, xXAU);
xStdevXAU = efsInternal("StdDev", Length, xXAU);
xMovCRB = sma(Length, xCRB);
xROCCRB = roc(1, xCRB);
xStdevCRB = efsInternal("StdDev", Length, xCRB);
xMovYBA = sma(40, xYBA);
xROC = roc(2);
xLLV = lowerDonchian(4);
xHHV = upperDonchian(4);
xMACD = macd( 12, 26, 9 );
xMACD_MA = ema(9, xMACD);
xMACDLL5 = lowerDonchian(5, xMACD);
xMACDLL50 = lowerDonchian(50, xMACD);
xMACDHH5 = upperDonchian(5, xMACD);
xMACDHH50 = upperDonchian(50, xMACD);
bInit = true;
}
if (getCurrentBarCount() < Length) return;
if (getCurrentBarIndex() == 0) return;
if (nState == BARSTATE_NEWBAR) {
aDIV1.pop();
aDIV1.unshift(nDIV1);
}
nsec1BOL = 1 + ((close(0) - xMA.getValue(0)
+ 2 * xStdev.getValue(0)) / (4 * xStdev.getValue(0) + 0.0001));
nsec2BOL = 1 + ((xXAU.getValue(0) - xMovXAU.getValue(0)
+ 2 * xStdevXAU.getValue(0)) / (4 * xStdevXAU.getValue(0) + 0.0001));
nsec3BOL = 1 + ((xCRB.getValue(0) - xMovCRB.getValue(0)
+ 2 * xStdevCRB.getValue(0)) / (4 * xStdevCRB.getValue(0) + 0.0001));
nDIV2 = (nsec2BOL - nsec1BOL) / nsec1BOL * 100;
nDIV3 = (nsec3BOL - nsec1BOL) / nsec1BOL * 100;
nDIV1 = Math.max(nDIV2, nDIV3);
aDIV1[0] = nDIV1;
//Buy
if (((HHV(3, aDIV1) > 10 &&
nDIV1 < aDIV1[1] &&
xROC.getValue(0) > 0 &&
close(0) > (1 + 0.7 / 100) * xLLV.getValue(0) &&
xMovYBA.getValue(0) > xMovYBA.getValue(-1)
) || (
nDIV1 > 40 &&
nDIV2 + nDIV3 > 80 &&
nDIV1 < aDIV1[1] &&
close(0) > close(-1) &&
close(0) > (1 +0.7 / 100) * xLLV.getValue(0)
) || (
CROSSABOVE(xMA15, xMA50) &&
xMovYBA.getValue(0) > xMovYBA.getValue(-1)
)) && !Strategy.isLong() && !Strategy.isShort()) {
Strategy.doLong("Entry Long", Strategy.CLOSE , Strategy.THISBAR, Strategy.getDefaultLotSize());
drawShape(Shape.UPARROW, BelowBar1, Color.lime);
setPriceBarColor(Color.lime);
}
//Sell short
if (((LLV(3, aDIV1) < -10 &&
nDIV1 > aDIV1[1] &&
xROC.getValue(0) < 0 &&
close(0) < (1 - 0.7 / 100) * xHHV.getValue(0) &&
xMovYBA.getValue(0) < xMovYBA.getValue(-1)
) || (
nDIV1 < -20 &&
nDIV2 + nDIV3 < -40 &&
nDIV1 > aDIV1[1] &&
close(0) < close(-1) &&
close(0) < (1 - 0.7 / 100) * xHHV.getValue(0)
) || (
CROSSBELOW(xMA50, xMA15) &&
xMovYBA.getValue(0) < xMovYBA.getValue(-1)
)) && !Strategy.isShort() && !Strategy.isLong()) {
Strategy.doShort("Entry Short", Strategy.CLOSE , Strategy.THISBAR, Strategy.getDefaultLotSize());
drawShape(Shape.DOWNARROW, AboveBar1, Color.red);
setPriceBarColor(Color.red);
}
//Sell
var nnDIV1 = Math.min(nDIV2, nDIV3);
if (((CROSSABOVE(xMACD_MA, xMACD) &&
xMACDHH5.getValue(0) > xMACDHH50.getValue(0)
) || (
nnDIV1 < -30 &&
(
xROCXAU.getValue(0) < - 0.5 ||
xROCCRB.getValue(0) < - 0.5
) &&
close(0) < (1 - 0.7 / 100) * xHHV.getValue(0)
) || (
nnDIV1 < 0 &&
xROCEURJPY.getValue(0) < -1 &&
close(0) < (1 - 0.7 / 100) * xHHV.getValue(0) &&
xMovEURJPY.getValue(0) < xMovEURJPY.getValue(-1)
)
) && Strategy.isLong()) {
Strategy.doSell("Exit Long", Strategy.CLOSE , Strategy.THISBAR, Strategy.getDefaultLotSize());
drawText("X", AboveBar1, Color.magenta, Text.BOLD|Text.CENTER|Text.FRAME);
setPriceBarColor(Color.magenta);
}
//Buy to cover
if (((CROSSBELOW(xMACD, xMACD_MA) &&
xMACDLL5.getValue(0) < xMACDLL50.getValue(-5)
) || (
nDIV1 > 30 &&
(
xROCXAU.getValue(0) > 0.5 ||
xROCCRB.getValue(0) > 0.5
) &&
close(0) > (1 + 0.7 / 100) * xHHV.getValue(0)
)
) && Strategy.isShort()) {
Strategy.doCover("Exit Short", Strategy.CLOSE , Strategy.THISBAR, Strategy.getDefaultLotSize());
drawText("X", BelowBar1, Color.magenta, Text.BOLD|Text.CENTER|Text.FRAME);
setPriceBarColor(Color.magenta);
}
return;
}
function StdDev(Period, DataArray) {
var sum = 0;
var avg = 0;
var res = 0;
if (getCurrentBarCount() < Period) return;
for (var barsBack = Period-1; barsBack >= 0; barsBack--) {
sum += DataArray.getValue(-barsBack);
}
avg = sum / Period;
sum = 0;
for (var barsBack = Period - 1; barsBack >= 0; barsBack--) {
sum += (DataArray.getValue(-barsBack) - avg) * (DataArray.getValue(-barsBack) - avg);
}
res = Math.sqrt(sum / Period);
return res;
}
function HHV(Period, aDataArray) {
var nRes = 0;
nRes = aDataArray[0];
for (var i = 0; i <= Period; i++) {
if (nRes < aDataArray[i]) nRes = aDataArray[i];
}
return nRes;
}
function LLV(Period, aDataArray){
var nRes = 0;
nRes = aDataArray[0];
for (var i = 0; i <= Period; i++) {
if (nRes > aDataArray[i]) nRes = aDataArray[i];
}
return nRes;
}
function CROSSABOVE(Series1, Series2) {
var bRes = false;
if (Series1.getValue(0) < Series2.getValue(0) && Series1.getValue(-1) > Series2.getValue(-1)) bRes = true;
return bRes;
}
function CROSSBELOW(Series1, Series2) {
var bRes = false;
if (Series1.getValue(0) > Series2.getValue(0) && Series1.getValue(-1) < Series2.getValue(-1)) bRes = true;
return bRes;
}
function verify() {
var b = false;
if (getBuildNumber() < 779) {
drawTextAbsolute(5, 35, "This study requires version 8.0 or later.",
Color.white, Color.blue, Text.RELATIVETOBOTTOM|Text.RELATIVETOLEFT|Text.BOLD|Text.LEFT,
null, 13, "error");
drawTextAbsolute(5, 20, "Click HERE to upgrade.@URL=https://www.esignal.com/download/default.asp",
Color.white, Color.blue, Text.RELATIVETOBOTTOM|Text.RELATIVETOLEFT|Text.BOLD|Text.LEFT,
null, 13, "upgrade");
return b;
} else {
b = true;
}
return b;
}
BACK TO LIST
WEALTH-LAB: TRADING THE AUSSIE
We have coded Markos Katsanos' Aussie strategy to the article's specifications in WealthScript with the generous assistance of the author. During the process, we discovered that the secondary symbol data had missing bars with respect to the primary symbol, Aud/Usd.
Wealth-Lab gives you the ability to control synchronization such that indicators based on secondary symbols should generally be created using the raw data before synchronizing the resulting data series with the chart. The code reflects this delayed synch approach.
Separately, it's important to note that indicators such as Macd and Ema require a fair amount of seed data (more than 100 bars for Macd) to stabilize their calculation before they can be used reliably for backtesting or trading. Even though the strategy ignores the first 100 bars, the initial trades can still be sensitive to the length of the seed data.
See Figure 3 for a sample chart.
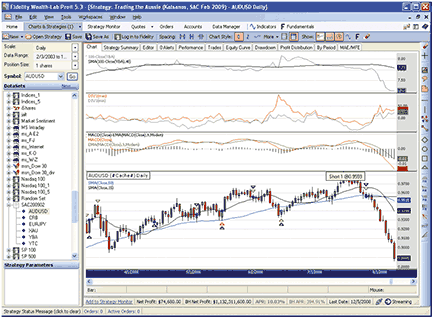
FIGURE 3: WEALTH-LAB, Trading the Aussie strategy. The strategy presciently reversed near the top and held the Aussie short from July through December 2008.
 WealthScript Code (C#):
/* Paste these methods inside the WealthScript-derived Strategy class */
private DataSeries SecBol( DataSeries ds, int period )
{
   DataSeries sd = 2 * StdDev.Series(ds, period, StdDevCalculation.Population);
   return 1 + ( ( ds - SMA.Series(ds, period) + sd ) / ( sd + sd + 0.0001 ) );
}
protected override void Execute()
{
   string sampleSym = "YBA";   // out-of-sample
   const double pct = 0.007;
   int per = 30;
   bool synch = false;
   DataSeries xau = GetExternalSymbol("XAU", synch).Close;           //sec2
   DataSeries crb = GetExternalSymbol("CRB", synch).Close;           //sec3
   DataSeries yba = 100 - GetExternalSymbol(sampleSym, synch).Close; //sec5
   DataSeries ej = GetExternalSymbol("EURJPY", synch).Close;        //sec6

   // initialize the initial values to account that yba data starts at 4/23/2008
   int stBar = DateTimeToBar(new DateTime(2003, 4, 23), false);
   for(int bar = 0; bar < stBar; bar++)
      yba[bar] = yba[stBar];

   // Based calculations from raw data and then synchronize
   DataSeries ybaSMA = Synchronize( SMA.Series(yba, 40) );
   DataSeries xauROC = Synchronize( ROC.Series(xau, 1) );
   DataSeries crbROC = Synchronize( ROC.Series(crb, 1) );
   DataSeries ejROC = Synchronize( ROC.Series(ej, 2) );
   ej = Synchronize( ej );
   yba =  Synchronize( yba );

   DataSeries sec1BOL = SecBol( Close, per );
   DataSeries sec2BOL = Synchronize( SecBol( xau, per ) );
   DataSeries sec3BOL = Synchronize( SecBol( crb, per ) );

   DataSeries DIV2 = 100 * (sec2BOL - sec1BOL)/sec1BOL;
   DataSeries DIV3 = 100 * (sec3BOL - sec1BOL)/sec1BOL;
   DataSeries DIV1 = DIV2 * 1d;
   DataSeries DIV1m = DIV3 * 1d;
   DIV1.Description = "DIV1(max)";
   DIV1m.Description = "DIV1(min)";
   for(int bar = 0; bar < Bars.Count; bar++) {
      DIV1[bar] =  Math.Max( DIV3[bar], DIV2[bar] );
      DIV1m[bar] =  Math.Min( DIV3[bar], DIV2[bar] );
   }

   DataSeries macd = MACD.Series(Close);
   DataSeries ema = EMA.Series(macd, 9, EMACalculation.Modern);
   DataSeries HH4 = Highest.Series(High, 4);
   DataSeries LL4 = Lowest.Series(Low, 4);

   /* Plotting */
   ChartPane macdPane = CreatePane( 40, true, true );
   ChartPane divPane = CreatePane( 40, true, true );
   ChartPane yldPane = CreatePane( 40, true, true );
   PlotSeries(yldPane, yba, Color.Fuchsia, LineStyle.Solid, 1);
   PlotSeries(yldPane, ybaSMA, Color.Black, LineStyle.Solid, 1);
   PlotSeries(macdPane, macd - ema, Color.Black, LineStyle.Histogram, 1);
   PlotSeries(macdPane, macd, Color.Red, LineStyle.Solid, 1);
   PlotSeries(macdPane, ema, Color.Green, LineStyle.Solid, 1);
   PlotSeries(divPane, DIV1, Color.Red, LineStyle.Solid, 1);
   PlotSeries(divPane, DIV1m, Color.Gray, LineStyle.Solid, 1);
   PlotSeries(PricePane, SMA.Series(Close, 50), Color.Blue, LineStyle.Solid, 1);
   PlotSeries(PricePane, SMA.Series(Close, 15), Color.Black, LineStyle.Solid, 1);
   HideVolume();

   for(int bar = 100; bar < Bars.Count; bar++)
   {
      double C = Close[bar];
      double C1 = Close[bar - 1];

      // Buy conditions - broken down to verify which is the triggering condition
      bool buy1 = Highest.Series(DIV1, 3)[bar] > 10
         && DIV1[bar] < DIV1[bar - 1]
         && ROC.Series(Close, 2)[bar] > 0
         && C > (1 + pct) * LL4[bar]
         && ybaSMA[bar] > ybaSMA[bar - 1];
      bool buy2 = DIV1[bar] > 40
         && DIV2[bar] + DIV3[bar] > 80
         && DIV1[bar] < DIV1[bar - 1]
         && C > C1
         && C > (1 + pct) * LL4[bar];
      bool buy3 = CrossOver(bar, SMA.Series(Close, 15), SMA.Series(Close, 50))
         && ybaSMA[bar] > ybaSMA[bar - 1];

      // Short Conditions
      bool sht1 = Lowest.Series(DIV1, 3)[bar] < -10
         && DIV1[bar] > DIV1[bar - 1]
         && ROC.Series(Close, 2)[bar] < 0
         && C < (1 - pct) * HH4[bar]
         && ybaSMA[bar] < ybaSMA[bar - 1];
      bool sht2 = DIV1[bar] < -20
         && DIV2[bar] + DIV3[bar] < -40
         && DIV1[bar] > DIV1[bar - 1]
         && C < C1
         && C < (1 - pct) * HH4[bar];
      bool sht3 = CrossOver(bar, SMA.Series(Close, 50), SMA.Series(Close, 15))
         && ybaSMA[bar] < ybaSMA[bar - 1];

      // Sell Conditions
      bool s1 = CrossOver(bar, ema, macd)
         && Highest.Series(macd, 5)[bar] > Highest.Series(macd, 50)[bar - 5];
      bool s2 = DIV1m[bar] < -30
         && ( xauROC[bar] < -0.5 || crbROC[bar] < -0.5 )
         && C < (1 - pct) * HH4[bar];
      bool s3 = DIV1m[bar] < 0
         && ejROC[bar] < -1
         && C < (1 - pct) * HH4[bar]
         && SMA.Series(ej, 40)[bar] < SMA.Series(ej, 40)[bar - 1];

      // Cover Conditions
      bool c1 = CrossOver(bar, macd, ema)
         && Lowest.Series(macd, 5)[bar] < Lowest.Series(macd, 50)[bar - 5];
      bool c2 = DIV1[bar] > 30
         && ( xauROC[bar] > 0.5 || crbROC[bar] > 0.5 )
         && C > (1 + pct) * HH4[bar];  // should it be LL4 as in Buy?

      if( IsLastPositionActive )
      {
         Position p = LastPosition;
         if( p.PositionType == PositionType.Long )
         {
            if ( sht1 || sht2 || sht3 )
            {
               SellAtClose(bar, p, "R:" + sht1 + "," + sht2 + "," + sht3 );
               ShortAtClose(bar, "reverse");
            }
            else if ( s1 || s2 || s3 )
               SellAtClose(bar, p, "X:" + s1 + "," + s2 + "," + s3);
         }
         else if ( buy1 || buy2 || buy3  )
         {
            CoverAtClose(bar, p,  "R:" + buy1 + "," + buy2 + "," + buy3 );
            BuyAtClose(bar, "reverse");
         }
         else if ( c1 || c2  )
            CoverAtClose(bar, p, "X:" + c1 + "," + c2 );
      }
      else if( buy1 || buy2 || buy3 )
         BuyAtClose(bar, buy1 + "," + buy2 + "," + buy3 );
      else if ( sht1 || sht2 || sht3 )
         ShortAtClose(bar, sht1 + "," + sht2 + "," + sht3);
   }
}
BACK TO LIST
AMIBROKER: TRADING THE AUSSIE
In "Trading The Aussie" in this issue, Markos Katsanos presents a trading system based on intermarket correlation between "commodity currencies" such as the Australian dollar and commodities such as oil, gold, silver, and so on.
The AmiBroker Formula Language implementation of both the trading system and the Bollinger band divergence indicator is presented in the Listing 1. To use it, simply enter the code into the Formula Editor, then choose the Tools->Apply Indicator menu from the editor to view the BB divergence chart (Figure 4). To backtest the system, choose Tools->Backtest from the Formula Editor menu. Before testing, you may need to adjust your system test settings and adjust the first four lines of code to match the symbology used by your data provider.
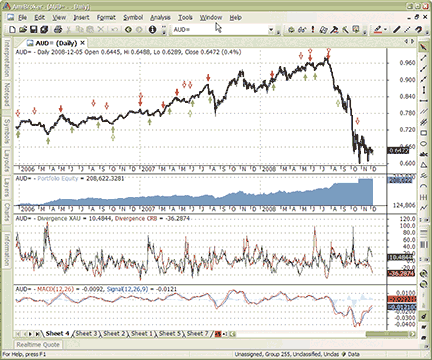
FIGURE 4: AmiBroker, Trading the Aussie strategy. Here is a sample daily chart of the Australian dollar shwoing trading arrows, system equity (second pane), XAU and CRB BB divergence lines (third pane), and the MACD (fourth pane).
 LISTING 1

// you would need to
// adjust symbol used in Foreign() function calls
// according to symbology of your data provider

SEC2 = Foreign( "^XAU", "C" );
SEC3 = Foreign( ".CRB", "C" );
SEC5 = 100 - Foreign( "@:YBAc1", "C" );
SEC6 = Foreign( "EURJPY=", "C" );
sec1BOL = 1 + ( ( C - MA( C, 30 ) + 2 * StDev( C, 30 ) ) / ( 4 * StDev( C, 30 ) + .0001 ) );
sec2BOL = 1 + ( ( SEC2 - MA( SEC2, 30 ) + 2 * StDev( SEC2, 30 ) ) / ( 4 * StDev( SEC2, 30 ) + .0001 ) );
sec3BOL = 1 + ( ( SEC3 - MA( SEC3, 30 ) + 2 * StDev( SEC3, 30 ) ) / ( 4 * StDev( SEC3, 30 ) + .0001 ) );
DIV2 = ( sec2BOL - sec1BOL ) / sec1bol * 100;
DIV3 = ( sec3BOL - sec1BOL ) / sec1bol * 100;
DIV1 = Max( DIV2, DIV3 );

// divergence plots
Plot( Div2, "Divergence XAU", colorDarkGreen );
Plot( Div3, "Divergence CRB", colorDarkRed );

Buy = ( HHV( DIV1, 3 ) > 10 AND
         DIV1 < Ref( DIV1, -1 ) AND
        ROC( C, 2 ) > 0 AND
        C > ( 1 + .7 / 100 ) * LLV( L, 4 ) AND
        MA( SEC5, 40 ) > Ref( MA( SEC5, 40 ), -1 ) )
      OR
       ( DIV1 > 40 AND
         DIV2 + DIV3 > 80 AND
         DIV1 < Ref( DIV1, -1 ) AND
        C > Ref( C, -1 ) AND
        C > ( 1 + .7 / 100 ) * LLV( L, 4 ) )
      OR
       ( Cross( MA( C, 15 ), MA( C, 50 ) ) AND
        MA( SEC5, 40 ) > Ref( MA( SEC5, 40 ), -1 ) );

Sell = ( Cross( EMA( MACD(), 9 ), MACD() )
         AND HHV( MACD(), 5 ) > Ref( HHV( MACD(), 50 ), -5 ) )
       OR
       ( DIV1 < -30 AND
         ( ROC( SEC2, 1 ) < -.5 OR
           ROC( SEC3, 1 ) < -.5 ) AND
         C < ( 1 - .7 / 100 ) * HHV( H, 4 ) )
       /*Negative Divergence*/
       OR
       ( DIV1 < 0
         AND ROC( SEC6, 2 ) < -1
         AND C < ( 1 - .7 / 100 ) * HHV( H, 4 )
         AND MA( SEC6, 40 ) < Ref( MA( SEC6, 40 ), -1 ) );
      /* Carry trade liquidation */

Short = ( LLV( DIV1, 3 ) < -10 AND
           DIV1 > Ref( DIV1, -1 ) AND
          ROC( C, 2 ) < 0  AND
          C < ( 1 - .7 / 100 ) * HHV( H, 4 ) AND
          MA( SEC5, 40 ) < Ref( MA( SEC5, 40 ), -1 ) )
        OR
         ( DIV1 < -20
          AND DIV2 + DIV3 < -40 AND
           DIV1 > Ref( DIV1, -1 ) AND
          C < Ref( C, -1 ) AND
          C < ( 1 - .7 / 100 ) * HHV( H, 4 ) ) OR
         ( Cross( MA( C, 50 ), MA( C, 15 ) )
          AND MA( SEC5, 40 ) < Ref( MA( SEC5, 40 ), -1 ) );

Cover = ( Cross( MACD(), MA( MACD(), 9 ) )  AND
          LLV( MACD(), 5 ) < Ref( LLV( MACD(), 50 ), -5 ) ) OR
         ( DIV1 > 30
          AND ( ROC( SEC2, 1 ) > .5 OR
                ROC( SEC3, 1 ) > .5 ) AND
          C > ( 1 + .7 / 100 ) * HHV( H, 4 ) );
BACK TO LIST
TD AMERITRADE: BOLLINGER BAND DIVERGENCE INDICATOR
In his article in this issue, "Trading The Aussie," Markos Katsanos discusses a trading strategy using a divergence indicator based on standard Bollinger bands. Here is the interpretation of this indicator using TD Ameritrade's StrategyDesk.
In the article, the author chooses the Bollinger band divergence indicator for this strategy, since he found that it provided better results than three other common indicators he measured. First, let us look at how to add the Bollinger band relative position, since it is a prerequisite of the divergence indicator. The relative position indicates on a percentage basis where the last trade price falls in the range between the upper and lower Bollinger bands. The scale ranges from zero at or below the lower band to 100 at or above the upper band.
 Bollinger Band Relative Position:  ((Bar[Close,D] > BollingerBands
 [Upper,Close,20,2,D]) * 1 + (Bar[Close,D] <= BollingerBands[Upper,
 Close,20,2,D] AND Bar[Close,D] >= BollingerBands[Lower,Close,20,2,D])
  * (Bar[Close,D] - BollingerBands[Lower,Close,20,2,D]) / (BollingerBands
  [Upper,Close,20,2,D] - BollingerBands[Lower,Close,20,2,D])) * 100
The divergence indicator is simply the difference between two securities' relative positions.
 Bollinger Band Divergence Indicator:  ((Bar[Close,D] > BollingerBands
 [Upper,Close,20,2,D]) * 1 + (Bar[Close,D] <= BollingerBands[Upper,Close,
 20,2,D] AND Bar[Close,D] >= BollingerBands[Lower,Close,20,2,D]) * (Bar[Close,D]
  - BollingerBands[Lower,Close,20,2,D]) / (BollingerBands[Upper,Close,20,2,D] -
BollingerBands[Lower,Close,20,2,D])) * 100 -
((Bar[Close,D,0,SPY] > BollingerBands[Upper,Close,20,2,D,0,SPY]) * 1 +
(Bar[Close,D,0,SPY] <= BollingerBands[Upper,Close,20,2,D,0,SPY] AND Bar
[Close,D,0,SPY] >= BollingerBands[Lower,Close,20,2,D,0,SPY]) * (Bar[Close,D,0,SPY]
- BollingerBands[Lower,Close,20,2,D,0,SPY]) / (BollingerBands[Upper,Close,20,2,D,0
,SPY] - BollingerBands[Lower,Close,20,2,D,0,SPY])) * 100
Please note that in the above formula for the divergence indicator, we have used the symbol Spy. The formula will be based off of the currently active chart symbol in StrategyDesk, so the insertion of a symbol into the syntax of the second half of the formula is to provide the comparison for the active chart symbol. Any pair of symbols can be used; the example put forth here is designed to measure a single symbol against a market barometer. The formulas above can be used in the backtesting module or to run a program trade. This could be done by using the zero line on the Divergence Indicator as an entry/exit mechanism, or by stipulating another point on the spectrum, such as 40 as the author mentions in the article.
The chart shown in Figure 5 shows the divergence indicator for Aapl as measured against Spy.
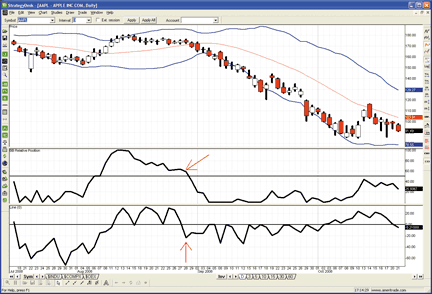
FIGURE 5: TD AMERITRADE, Trading the Aussie strategy. AAPL is shown with a two-standard-deviation Bollinger band. The middle pane is the relative position of AAPL, and the lower pane is the divergence indicator showing the difference between AAPL and SPY. The red arrows indicate a point where although AAPL�s relative position is above the 20-period MA, the divergence indicator shows that it is at a relative position below that of SPY. [For illustrative purposes only.]
If you have questions about this formula or functionality, please call TD Ameritrade's StrategyDesk help line free of charge at 800 228-8056 between 8 a.m. and 8 p.m. ET Monday through Friday, or access the Help Center via the StrategyDesk application. StrategyDesk is a downloadable application free for all TD Ameritrade clients. Regular commission rates apply.
TD Ameritrade and StrategyDesk do not endorse or recommend any particular trading strategy.
BACK TO LIST
NEUROSHELL: TRADING THE AUSSIE
The Australian dollar intermarket Bollinger band divergence system described by Markos Katsanos in his article in this issue, "Trading The Aussie," can be implemented in NeuroShell Trader by combining a few of NeuroShell Trader's 800+ indicators. To recreate the Bollinger band divergence indicator described in the article, select "New Indicator" from the Insert menu and use the Indicator Wizard to create the following indicators:
 SECBOL: Add2( 1, Divide( Sub( Close, BBLow( Close, 30, 2)),
            Add2(Sub(BBHigh(Close,30,2),BBLow(Close,30,2)),0.0001)))


DIVERG: Multiply2( Divide( Sub(SECBOL( XAU,30,2),
           SECBOL(Close,30,2)), SECBOL(Close,30,2)),100)
In addition, use the Indicator Wizard to create the following intermediate indicators that will be used in the trading system:
DIV2: 	DIVERG( XAU, Close, 30, 2)

DIV3: 	DIVERG( CRB, Close, 30, 2)

DIV1MAX: 	Max2( DIV1, DIV2 )

DIV1MIN: 	Min2( DIV1, DIV2 )
To recreate the Australian dollar intermarket Bollinger band divergence system described in the article (see Figure 6), select "New Trading Strategy" from the Insert menu and enter the following in the appropriate locations of the Trading Strategy Wizard:
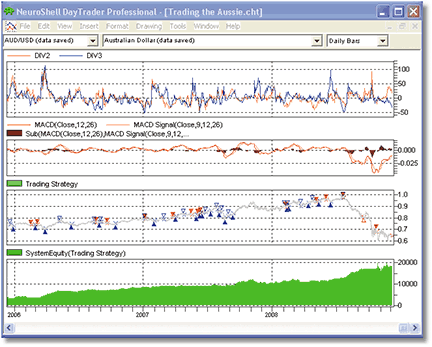
FIGURE 6: NeuroShell, TRADING THE AUSSIE. Here is the AUD intermarket BB divergence system in NeuroShell.
	Buy long when one of the following conditions is true:

And2( And4( A>B( Maximum(DIV1MAX, 3), 10),
A<B( DIV1MAX, Lag(DIV1MAX, 1)),
A>B( %Change( Close, 2), 0),
A>B( Close, Multiply2( 1.007, Minimum( Low, 4)))),
Or2( A>B( Momentum( MovAvg( Sub(100,YTCc1), 40), 1), 0),
A>B( Momentum( MovAvg( Sub(100,YBAc1), 40), 1), 0)))

And2( And4( A>B( DIV1MAX, 40),
A>B( Add2( DIV2, DIV3), 80),
A<B( DIV1MAX,Lag( DIV1MAX, 1)),
A>B( Close, Lag( Close, 1)))
A>B( Close, Multiply2( 1.007, Minimum( Low, 4))))

And2 ( CrossAbove ( MovAvg( Close, 15), MovAvg( Close, 50) ),
A>B( Momentum( MovAvg( Sub(100,YBAc1), 40), 1), 0 ))

	Sell long when one of the following conditions is true:

And2( CrossAbove( MACDSignal( Close, 9, 12, 26), MACD( Close, 12, 26) ),
A>B( Maximum( MACD( Close, 12, 26), 5), Lag(Maximum(MACD( Close, 12, 26), 50), 5)))

And3( A<B( DIV1MIN, -30 ),
Or2 ( A<B( %Change(XAU,1), -0.5 ),
A<B( %Change(CRB,1),-0.5 ))
A<B( Close, Multiply2( 1.007, Maximum(High,4))))

And4( A<B( DIV1MIN, 0 ),
A<B( %Change( EURJPY, 2), -1 ),
A<B( Close, Multiply2( 1.007, Maximum(High,4))),
A<B( Momentum( MovAvg( EURJPY, 40), 1), 0) )

	Sell short when one of the following conditions is true:

And2( And4( A<B( Minimum(DIV1MAX, 3), -10),
A>B( DIV1MAX, Lag(DIV1MAX, 1)),
A<B( %Change( Close, 2), 0),
A<B( Close, Multiply2( 1.007, Maximum( High, 4)))),
Or2( A<B( Momentum( MovAvg( Sub(100,YTCc1), 40), 1), 0),
A<B( Momentum( MovAvg( Sub(100,YBAc1), 40), 1), 0)))

And2( And4( A<B( DIV1MAX, -20),
A<B( Add2( DIV2, DIV3), -40),
A>B( DIV1MAX,Lag( DIV1MAX, 1)),
A<B( Close, Lag( Close, 1)))
A<B( Close, Multiply2( 1.007, Maximum( High, 4))))

And2( CrossBelow ( MovAvg( Close, 15), MovAvg( Close, 50) ),
A<B( Momentum( MovAvg( Sub(100,YBAc1), 40), 1), 0 ))

	Cover short when one of the following conditions is true:

And2( CrossBelow( MACDSignal( Close, 9, 12, 26), MACD( Close, 12, 26) ),
A<B( Minimum( MACD( Close, 12, 26), 5), Lag(Minimum(MACD( Close, 12, 26), 50), -5)))

And3(	A>B( DIV1MAX, 30 ),
Or2( A>B( %Change(XAU,1), 0.5 ),
A>B( %Change(CRB,1), 0.5 ))
A>B( Close, Multiply2( 1.007, Maximum(High,4))))
If you have NeuroShell Trader Professional, you can also choose whether the system parameters should be optimized. After backtesting the trading strategy, use the "Detailed Analysis... " button to view the backtest and trade-by-trade statistics for the strategy.
Users of NeuroShell Trader can go to the Stocks & Commodities section of the NeuroShell Trader free technical support website to download a copy of this or any past Traders� Tips.
BACK TO LIST
AIQ: TRADING THE AUSSIE
The Aiq code is shown here for the forex intermarket BB divergence system described by Markos Katsanos in his article in this issue, "Trading the Aussie."
Although some of the strongest features of Aiq software are in the area of stock groups and portfolio-level testing, forex can be set up in Aiq and tested with the Eds module and portfolio modules.
There is no special setup for a forex data type, but forex can be set up as a stock. The backtest results are shown as percent changes in price in the Eds module and the contract size, pip values, and interest rates are not taken into account. To convert the test results to dollars, we would need to export the Eds trades to Excel and then calculate manually using the spreadsheet the actual dollars earned as well as the debit and credit interest, as did the author.
We can run a simulation in the Portfolio Manager and get a non-compounded, consolidated equity curve on a one-contract basis, as shown in Figure 7. This equity curve is without the debit and credit interest, which comes to a net credit of around $7,000 for this period on a one-contract basis.
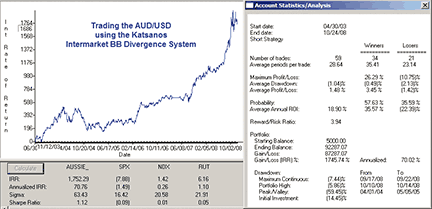
FIGURE 7: AIQ, TRADING THE AUSSIE. Here is a simulated equity curve trading the AUD/USD using AIQ�s Portfolio Manager. It is shown without commission, slippage, or debit and credit interest, using 20 to 1 leverage.
Forex offers extreme leverage of 40 to 1 or more depending on the broker. Since the Portfolio Simulator was designed for stocks, it only allows for 2-to-1 leverage. To work around this, I ran the simulation with 1-to-1 leverage, and then after the simulation completed, I changed the initial deposit via the journal tab down to $5,000 from the original $100,000. This simulated trading with 20-to-1 leverage. To simulate the contract size of $100,000, I set the initial capital to $100,000 and did not compound the results, so that each trade represents trading a single $100,000 contact.
The data for Audusd, Eurjpy and Xau can be downloaded from Aiq�s data service using these symbols, but the data for the Crb index and the Ytc futures may need to be obtained from other sources and then imported via the Dtu import utility. I had to get the latter two data files from the author, as I was unable to find them in any of my current data subscriptions.
The code can be downloaded from the Aiq website at www.aiqsystems.com and also from www.TradersEdgeSystems.com/traderstips.htm (sample data files in Aiq format will also be posted there).
 !! TRADING THE AUSSIE
! Author: Markos Katsanos, TASC February 2009
! Coded by: Richard Denning 12/08/2008
! www.TradersEdgeSystems.com

C is [close].  H is [high].  L is [low].
SEC2 is tickerUDF("XAU",C).
SEC3 is tickerUDF("CRBidx",C).
SEC5 is 100 - tickerUDF("YBAc1",C).
SEC6 is tickerUDF("EURJPY",C).
sma1A is simpleavg(C,15).
sma1B is simpleavg(C,50).
sma1 is simpleavg(C,30).
sma2 is simpleavg(SEC2,30).
sma3 is simpleavg(SEC3,30).
sma5 is simpleavg(SEC5,30).
sma5A is simpleavg(SEC5,40).
sma6 is simpleavg(SEC6,40).
stdev1 is sqrt(variance(C,30)).
stdev2 is sqrt(variance(SEC2,30)).
stdev3 is sqrt(variance(SEC3,30)).
macd is expavg(C,12) - expavg(C,26).
macdSig is expavg(macd,9).
sec1BOL is 1+((C-sma1+2*stdev1) / (4*stdev1+0.0001)).
sec2BOL is 1+((SEC2-sma2+2*stdev2) / (4*stdev2+0.0001)).
sec3BOL is 1+((SEC3-sma3+2*stdev3) / (4*stdev3+0.0001)).
DIV2 is (sec2BOL-sec1BOL) / sec1BOL*100.
DIV3 is (sec3BOL-sec1BOL) / sec1BOL*100.
DIV1 is max(DIV2, DIV3).

LE1 if highresult(DIV1,3) > 10 and DIV1 < valresult(DIV1,1)
        and (C / valresult(C,2)-1)*100 > 0 and C > (1+0.7/100)*lowresult(L,4)
        and  sma5A > valresult(sma5A,1).
LE2 if DIV1 > 40 and DIV2 + DIV3 > 80 and DIV1 < valresult(DIV1,1)
       and C > valresult(C,1) and C > (1+0.7/100)*lowresult(L,4).
LE3 if  sma1A > sma1B and valresult(sma1A,1) < valresult(sma1B,1)
       and sma5A > valresult(sma5A,1).
Buy if LE1 or LE2 or LE3.

LX1 if macd < macdSig and valresult(macd,1) > valresult(macdSig,1)
       and highresult(macd,5) > highresult(macd,50,5).
LX2 if DIV1 < -30
        and ((SEC2 / valresult(SEC2,1)-1)*100 < -0.5
	or (SEC3 / valresult(SEC3,1)-1)*100 < -0.5)
        and C < (1 - 0.7/100)*highresult(H,4).
LX3 if DIV1 < 0 and (SEC6 / valresult(SEC6,1)-1)*100 < -1
       and C < (1 - 0.7/100)*highresult(H,4).
ExitLong if LX1 or LX2 or LX3 or SE1 or SE2 or SE3.

SE1 if lowresult(DIV1,3) < -10 and DIV1 > valresult(DIV1,1)
       and (C / valresult(C,2)-1)*100 < 0 and C < (1 - 0.7/100)*highresult(H,4) and  sma5A < valresult(sma5A,1).
SE2 if DIV1 < -20 and DIV2 + DIV3 < -40 and DIV1 > valresult(DIV1,1)
        and C < valresult(C,1) and  C < (1 - 0.7/100)*highresult(H,4).
SE3 if  sma1A < sma1B and valresult(sma1A,1) > valresult(sma1B,1).
SellShort if SE1 or SE2 or SE3.

SX1 if macd > macdSig and valresult(macd,1) < valresult(macdSig,1)
       and lowresult(macd,5) < lowresult(macd,50,5).
SX2 if DIV1 > 30 and ((SEC2 / valresult(SEC2,1)-1)*100 > 0.5
		or (SEC3 / valresult(SEC3,1)-1)*100 > 0.5)

	             and C > (1 + 0.7/100)*highresult(H,4).
CoverShort if SX1 or SX2 or LE1 or LE2 or LE3.
BACK TO LIST
TRADERSTUDIO: TRADING THE AUSSIE
The TradersStudio code for Markos Katsanos's article, "Trading the Aussie," is shown here. The TradersStudio software provides specifically for the particulars involved in accurate system testing for forex trading. In Figure 8, I show the data setups that I used for my Aud/Usd data. There are two places where the settings are input. In the Data Manager, the data universe must be set to match the data being used. Some forex data is out to five decimal places, while most is four decimal places. It is important to get this right in the data universe. I used four decimal places, and so the pip is set to 0.0001 and the value of one pip for the Aud/Usd is 10 when the lot size is 100,000 Usd. Also in the Data Manager, the Forex Map (shown as the bottom part of Figure 8) must be configured as shown. By reading the Base and Quote interest rate files, the software is able to compute the interest earned or charged on each forex trade.
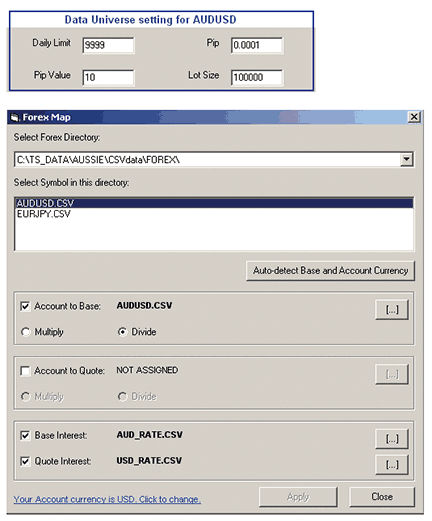
FIGURE 8: TRADERSTUDIO, FOREX TRADING. Here are the data settings for AUDUSD for the data universe and the forex map.
Figure 9 shows part of two reports that are standard with TraderStudio. The upper portion, titled "Trades for session," shows how each trade has the interest calculated and then added to the profit or loss from the change in the price to get the actual adjusted trade profit or loss. The report at the bottom of Figure 8, titled "Trades in pips," is a report unique to forex that shows the number of pips gained or lost on each trade.
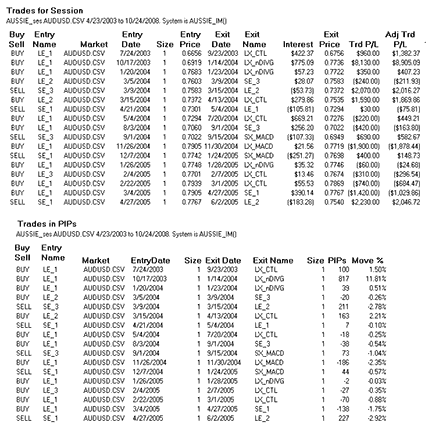
FIGURE 9: TRADERSTUDIO, FOREX TRADING REPORT. Here are partial forex trade-by-trade reports showing automatic forex interest calculations and trades calculated in pips.
' TRADING THE AUSSIE
' Author: Markos Katsanos, TASC Feb 2009
' Coded by: Richard Denning 12/09/08
' www.TradersEdgeSystems.com

Sub AUSSIE_IM()
Dim bbLen,macLenS,macLenL,macLenSig,useExits
bbLen=30
macLenS=12
macLenL=26
macLenSig=9
useExits=1

Dim AUDUSD As BarArray  'AUDUSD forex x-rate AUD/USD
Dim XAU As BarArray     'XAU Philadelphia Gold & Silver Index
Dim CRB As BarArray     'CRB Commodity Research Board Index
Dim YBA As BarArray     '90-day Bank Bill Futures (Australian)
Dim EURJPY As BarArray  'EURJPY forex x-rte for EUR/JPY
Dim DIV1max As BarArray
Dim DIV1min As BarArray
Dim DIV2 As BarArray
Dim DIV3 As BarArray
Dim sma1 As BarArray
Dim sma2 As BarArray
Dim sma5 As BarArray
Dim sma6 As BarArray
Dim bRule1, bRule2, bRule3, bRule4, bRule5
Dim bRule6, bRule7, bRule8, bRuleAll
Dim sRule1, sRule2, sRule3, sRule4, sRule5
Dim sRule6, sRule7, sRule8
Dim ssRule1, ssRule2, ssRule3, ssRule4, ssRule5
Dim ssRule6, ssRule7, ssRuleAll
Dim csRule1, csRule2, csRule3, csRule4, csRule5

Dim macd1 As BarArray, macd2 As BarArray, macd3 As BarArray
Dim sigMACD As BarArray
Dim myDate
myDate = FormatDateTime(Date)
AUDUSD = C
XAU = C Of independent1         'sec2
CRB = C Of independent2         'sec3
YBA = 100 - C Of independent3   'sec5
EURJPY = C Of independent4      'sec6
sma1 = Average(C,15,0)
sma2 = Average(C,50,0)
sma5 = Average(YBA,40,0)
sma6 = Average(EURJPY,40,0)
DIV2 = BB_DIVERG(AUDUSD,XAU,bbLen)
DIV3 = BB_DIVERG(AUDUSD,CRB,bbLen)
DIV1max = Max(DIV2,DIV3)
DIV1min = Min(DIV2,DIV3)
'macd2 = XAverage(C,macLenS,0) - XAverage(C,macLenL,0)
macd1 = macd_equis(C,0.15,0.075)

sigMACD = XAverage(macd1,macLenSig,0)

' BUY:
' Buy Type 1:
bRule1 = Highest(DIV1max,3,0) > 10 And DIV1max < DIV1max[1]
bRule2 = (C/C[2]-1)*100 > 0 And C > (1 + 0.7/100) * Lowest(L,4,0)
bRule3 = sma5 > sma5[1]
' Buy Type 2:
bRule4 = DIV1max > 40 And DIV2 + DIV3 > 80 And DIV1max < DIV1max[1]
bRule5 = C > C[1] And C > (1 + 0.7/100)* Lowest(L,4,0)
' Buy Type 3:
bRule6 = sma1 > sma2 And sma1[1] < sma2[1]
bRule7 = sma5 > sma5[1]
' Combined Buy
bRuleAll = (bRule1 And bRule2 And bRule3) Or (bRule4 And bRule5) Or (bRule6 And bRule7)

If (bRule1 And bRule2 And bRule3)  Then
    Buy("LE_1",1,0,CloseEntry,Day)
End If

If (bRule4 And bRule5) Then
   Buy("LE_2",1,0,CloseEntry,Day)
End If

If  (bRule6 And bRule7) Then
    Buy("LE_3",1,0,CloseEntry,Day)
End If

If useExits = 1 Then
' SELL (exit longs)
' Exit Condition1:
sRule1 = macd1 < sigMACD And macd1[1] > sigMACD[1]
sRule2 = Highest(macd1,5,0) > Highest(macd1,50,5)

' Exit Condition2:
sRule3 = DIV1min < -30
sRule4 = (XAU/XAU[1]-1)*100 < -0.5 Or (CRB/CRB[1]-1)*100 < -0.5
sRule5 = C < (1 - 0.7/100) * Highest(H,4,0)

' Exit Condition3:
sRule6 = DIV1min < 0 And (EURJPY/EURJPY[2]-1)*100 < -1
sRule7 = C < (1 - 0.7/100) * Highest(H,4,0)
sRule8 = sma6 < sma6[1]

If sRule1 And sRule2 then 'And bRuleAll = 0 Then
    ExitLong("LX_MACD","",1,0,CloseExit,Day)
End If

If sRule3 And sRule4 And sRule5 then 'And bRuleAll = 0 Then
    ExitLong("LX_nDIVG","",1,0,CloseExit,Day)
End If

If sRule6 And sRule7 And sRule8 then 'And bRuleAll = 0 Then
    ExitLong("LX_CTL","",1,0,CloseExit,Day)
End If
End If

' SELL SHORT
' Sell Short Type 1:
ssRule1 = Lowest(DIV1max,3,0) < -10 And DIV1max < DIV1max[1]
ssRule2 = (C/C[2]-1)*100 < 0 And C < (1 - 0.7/100) * Highest(H,4,0)
ssRule3 = sma5 < sma5[1]
' Sell Short Type 2:
ssRule4 = DIV1max < -20 And DIV2 + DIV3 < -40 And DIV1max > DIV1max[1]
ssRule5 = C < C[1] And C < (1 - 0.7/100)* Highest(H,4,0)
' Sell Short Type 3:
ssRule6 = sma1 < sma2 And sma1[1] > sma2[1]
ssRule7 =  sma5 < sma5[1]
' Sell Short Combined
ssRuleAll = (ssRule1 And ssRule2 And ssRule3) Or (ssRule4 And ssRule5) Or (ssRule6
And ssRule7)

If (ssRule1 And ssRule2 And ssRule3) Then
    Sell("SE_1",1,0,CloseEntry,Day)
End If
If (ssRule4 And ssRule5) Then
    Sell("SE_2",1,0,CloseEntry,Day)
End If
If (ssRule6 And ssRule7) Then
    Sell("SE_3",1,0,CloseEntry,Day)
End If

If useExits = 1 Then
' BUY TO COVER (exit or cover short)
' Exit Short Condition1:
csRule1 = macd1 > sigMACD And macd1[1] < sigMACD[1]
csRule2 = Lowest(macd1,5,0) < Lowest(macd1,50,5)
' Exit Short Condition2:
csRule3 = DIV1max > 30
csRule4 = (XAU/XAU[1]-1)*100 > 0.5 Or (CRB/CRB[1]-1)*100 > 0.5
csRule5 = C > (1 + 0.7/100) * Highest(H,4,0)

If csRule1 And csRule2 then 'And ssRuleAll = 0 Then
    ExitShort("SX_MACD","",1,0,CloseExit,Day)
End If
If csRule3 And csRule4 And csRule5 then 'And ssRuleAll = 0 Then
    ExitShort("SX_pDIVG","",1,0,CloseExit,Day)
End If

End If

End Sub

_____________________________________________________

' TRADING THE AUSSIE
' Author: Markos Katsanos, TASC Feb 2009
' Coded by: Richard Denning 12/09/08
' www.TradersEdgeSystems.com

Function BB_DIVERG(sec1 As BarArray, sec2 As BarArray, bbLen As Integer)

Dim sma1, sma2
Dim stdev1, stdev2
Dim sec1BB, sec2BB
Dim myDate
myDate = FormatDateTime(Date)

sma1 = Average(sec1, bbLen)
sma2                bLen)
stdev2 = StdDev(sec2, bbLen)
sec1BB = 1 + ((sec1-sma1+2*stdev1)/(4*stdev1+0.0001))
sec2BB = 1 + ((sec2-sma2+2*stdev2)/(4*stdev2+0.0001))

BB_DIVERG = (sec2BB-sec1BB)/sec1BB*100

End Function

_____________________________________________________

' TRADING THE AUSSIE
' Author: Markos Katsanos, TASC Feb 2009
' Coded by: Richard Denning 12/09/08
' www.TradersEdgeSystems.com

Function macd_equis(price As BarArray, emaFactorFast, emaFactorSlow)
'if inputs = C, 0.075, 0.15 then macd() will match the built-in macd from
Metastock/Equis
Dim emaFast As BarArray
Dim emaSlow As BarArray

emaFast = emaFast[1] + emaFactorFast*(price-emaFast[1])
emaSlow = emaSlow[1] + emaFactorSlow*(price-emaSlow[1])
'print emaFast, " ", emaSlow
macd_equis = emaFast - emaSlow

End Function
The code can be downloaded from the TradersStudio website at www.TradersStudio.com ->Traders Resources->FreeCode and also from www.TradersEdgeSystems.com/traderstips.htm.
BACK TO LIST
STRATASEARCH: TRADING THE AUSSIE
Correlations across markets can offer some very helpful information to traders, and this is one of the reasons StrataSearch provides a great deal of functionality in this area. In fact, the correlations and divergences used in the Aud intermarket system are very similar to some of the trading rules commonly used in StrataSearch�s automated search.
After setting up and testing the Aud intermarket system, we found it performed surprisingly well. Percentage of profitable trades was an impressive 75%. The system was also profitable in each year of our tests (2005—08), although the largest gains came primarily in the final two years. One area of concern was that trades could lose heavily in some cases. A trade in 2005 lost over 50% in our backtest. However, the author suggests in the final paragraph of the article that supplemental exits may be helpful, so the use of a stop may be a worthwhile addition.
While this system appears to perform quite well on its own, traders may wish to perform an automated search to look for correlations across other markets. StrataSearch contains a number of useful tools allowing you to search for a wide variety of intermarket correlations and divergences.
As with all other Traders' Tips, additional information, including plug-ins, can be found in the Shared Area of the StrataSearch user forum. This month�s plug-in contains the code for the Aud intermarket system, as well as a strategy and trading rule to include this system in your automated searches. See Figure 10.
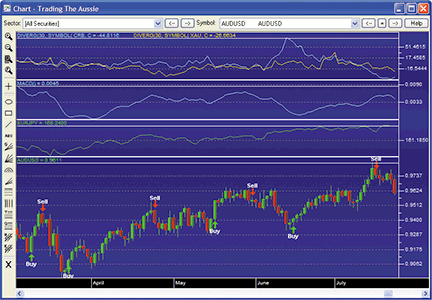
FIGURE 10: STRATASEARCH, Aud intermarket system. The buy and sell signals in the bottom panel show just how effectively the AUD intermarket system can perform.
 //**************************************************************************
// AUD Intermarket Buy Signal
//**************************************************************************
SEC2=symbol(.XAU,C);
SEC3=symbol(.CRB,C);
SEC5=100-symbol(@:YBAc1,C);
sec1BOL=1+((C- Mov(C,30,S)+2*Sdev(C,30))/(4*Sdev(C,30)+.0001));
sec2BOL=1+((SEC2- Mov(SEC2,30,S)+2*Sdev(SEC2,30))/(4*Sdev(SEC2,30)+.0001));
sec3BOL=1+((SEC3- Mov(SEC3,30,S)+2*Sdev(SEC3,30))/(4*Sdev(SEC3,30)+.0001));
DIV2=(sec2BOL-sec1BOL)/sec1bol*100;
DIV3=(sec3BOL-sec1BOL)/sec1bol*100;
DIV1=HIGHER(DIV2,DIV3);
AUDbuy = IF((HIGH(DIV1,3)>10 AND DIV10 AND C>(1+.7/100)*LOW(L,4) AND
MOV(SEC5,40,S)> REF(MOV(SEC5,40,S),-1)) OR
(DIV1>40 AND DIV2+DIV3>80 AND DIV1REF(C,-1) AND  C>(1+.7/100)*LOW(L,4)) OR
(CROSSABOVE(MOV(C,15,S),MOV(C,50,S)) AND
MOV(SEC5,40,S)> REF(MOV(SEC5,40,S),-1)), 1, 0);

//**************************************************************************
// AUD Intermarket Sell Signal
//***************************************************************************
SEC2=symbol(.XAU,C);
SEC3=symbol(.CRB,C);
SEC6=symbol(EURJPY,C);
sec1BOL=1+((C-Mov(C,30,S)+2*Sdev(C,30))/(4*Sdev(C,30)+.0001));
sec2BOL=1+((SEC2- Mov(SEC2,30,S)+2*Sdev(SEC2,30))/(4*Sdev(SEC2,30)+.0001));
sec3BOL=1+((SEC3- Mov(SEC3,30,S)+2*Sdev(SEC3,30))/(4*Sdev(SEC3,30)+.0001));
DIV2=(sec2BOL-sec1BOL)/sec1bol*100;
DIV3=(sec3BOL-sec1BOL)/sec1bol*100;
DIV1=LOWER(DIV2,DIV3);
AUDsell = IF((CROSSABOVE(MOV(MACD(),9,E),MACD()) AND
HIGH(MACD(),5)>REF(HIGH(MACD(),50),-5)) OR
(DIV1<-30 AND (PROC(SEC2,1)<-.5 OR
PROC(SEC3,1)<-.5) AND C<(1-.7/100)*HIGH(H,4)) OR
(DIV1<0 AND PROC(SEC6,2)<-1  AND C<(1-.7/100)*HIGH(H,4) AND
MOV(SEC6,40,S)<REF(MOV(SEC6,40,S),-1)), 1, 0);

//**************************************************************************
// AUD Intermarket Sell Short
//**************************************************************************
SEC2=symbol(.XAU,C);
SEC3=symbol(.CRB,C);
SEC5=100-symbol(@:YBAc1,C);
sec1BOL=1+((C- Mov(C,30,S)+2*Sdev(C,30))/(4*Sdev(C,30)+.0001));
sec2BOL=1+((SEC2- Mov(SEC2,30,S)+2*Sdev(SEC2,30))/(4*Sdev(SEC2,30)+.0001));
sec3BOL=1+((SEC3- Mov(SEC3,30,S)+2*Sdev(SEC3,30))/(4*Sdev(SEC3,30)+.0001));
DIV2=(sec2BOL-sec1BOL)/sec1bol*100;
DIV3=(sec3BOL-sec1BOL)/sec1bol*100;
DIV1=HIGHER(DIV2,DIV3);
AUDsellshort = IF((LOW(DIV1,3)<-10 AND DIV1>REF(DIV1,-1) AND
PROC(C,2)<0 AND C<(1-.7/100)*HIGH(H,4) AND
MOV(SEC5,40,S)< REF(MOV(SEC5,40,S),-1)) OR
(DIV1<-20 AND DIV2+DIV3<-40 AND DIV1>REF(DIV1,-1) AND
C<REF(C,-1) AND C<(1-.7/100)*HIGH(H,4)) OR
(CROSSABOVE(MOV(C,50,S),MOV(C,15,S)) AND
MOV(SEC5,40,S)< REF(MOV(SEC5,40,S),-1)), 1, 0);

//***************************************************************************
// AUD Intermarket Buy To Cover
//**************************************************************************
SEC2=symbol(.XAU,C);
SEC3=symbol(.CRB,C);
sec1BOL=1+((C- Mov(C,30,S)+2*Sdev(C,30))/(4*Sdev(C,30)+.0001));
sec2BOL=1+((SEC2-Mov(SEC2,30,S)+2*Sdev(SEC2,30))/(4*Sdev(SEC2,30)+.0001));
sec3BOL=1+((SEC3-Mov(SEC3,30,S)+2*Sdev(SEC3,30))/(4*Sdev(SEC3,30)+.0001));
DIV2=(sec2BOL-sec1BOL)/sec1bol*100;
DIV3=(sec3BOL-sec1BOL)/sec1bol*100;
DIV1=HIGHER(DIV2,DIV3);
AUDbuytocover = IF((CROSSABOVE(MACD(),MOV(MACD(),9,E))
AND LOW(MACD(),5)<REF(LOW(MACD(),50),-5)) OR
(DIV1>30 AND (PROC(SEC2,1)>.5 OR
PROC(SEC3,1)>.5) AND C>(1+.7/100)*HIGH(H,4)), 1, 0);
BACK TO LIST
TRADE NAVIGATOR: TRADING THE AUSSIE
Trade Navigator offers many of the features needed to implement the strategy described by Markos Katsanos in his article in this issue, "Trading The Aussie." Here, we will show you how to add these features to a chart and how to create the custom indicators that are not built into Trade Navigator.
You can recreate the custom highlight markers and indicator used in the "Trading The Aussie" article using the following TradeSense code.
First, open the Trader's Toolbox, click on the Functions tab, click the New button, and enter the following formula (Figure 11):
 TTA BB Divergence

&SEC2 := Close Of "$XAU"
&sec1BOL := 1 + ((Close - MovingAvg (Close , D1)
            + 2 * MovingStdDev (Close, D1))
            / (4 * MovingStdDev (Close, D1) + 0.0001))
&sec2BOL := 1 + ((&SEC2 - MovingAvg (&SEC2 , D1)
            + 2 * MovingStdDev (&SEC2, D1))
            / (4 * MovingStdDev (&SEC2, D1) + 0.0001))
(&sec2BOL - &sec1BOL) / &sec1BOL * 100
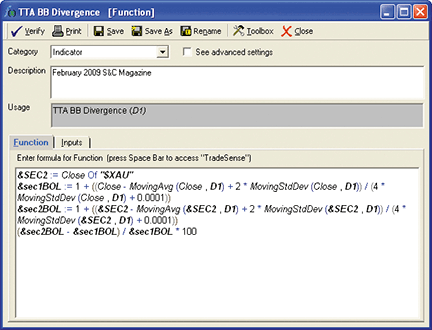
FIGURE 11: TRADE NAVIGATOR, TRADER�S TOOLBOX. Enter the TTA Bollinger bands divergence formula into the Functions tab as shown. We used a default value of 30 for D1.
When you are finished, click the Save button, type a name for your new function, and click OK. Repeat these steps for the Tta Buy, Tta Buy to Cover, Tta Sell and Tta Sell Short:
 TTA Buy

&SEC2 := Close Of "$XAU"
&SEC3 := Close Of "$CRBX"
&SEC5 := 100 - Close Of "YB-057"
&sec1BOL := 1 + ((Close - MovingAvg (Close, 30) + 2 * MovingStdDev (Close, 30)) / (4 * MovingStdDev (Close, 30) + 0.0001))
&sec2BOL := 1 + ((&SEC2 - MovingAvg (&SEC2, 30) + 2 * MovingStdDev (&SEC2, 30)) / (4 * MovingStdDev (&SEC2, 30) + 0.0001))
&sec3BOL := 1 + ((&SEC3 - MovingAvg (&SEC3, 30) + 2 * MovingStdDev (&SEC3, 30)) / (4 * MovingStdDev (&SEC3, 30) + 0.0001))
&DIV2 := (&sec2BOL - &sec1BOL) / &sec1BOL * 100
&DIV3 := (&sec3BOL - &sec1BOL) / &sec1BOL * 100
&DIV1 := Max (&DIV2, &DIV3)

(Highest (&DIV1, 3) > 10 And &DIV1 < &DIV1.1 And RateOfChange (Close, 2) > 0
   And Close > (1 + .7 / 100) * Lowest (Low, 4)
   And MovingAvg (&SEC5, 40) > MovingAvg (&SEC5, 40).1)
   Or (&DIV1 > 40 And &DIV2 + &DIV3 > 80 And &DIV1 < &DIV1.1
   And Close > Close.1 And Close > (1 + .7 / 100) * Lowest (Low, 4))
   Or (Crosses Above (MovingAvg (Close, 15), MovingAvg (Close, 50))
   And MovingAvg (&SEC5, 40) > MovingAvg (&SEC5, 40).1)

TTA Buy to Cover

&SEC2 := Close Of "$XAU"
&SEC3 := Close Of "$CRBX"
&sec1BOL := 1 + ((Close - MovingAvg (Close, 30) + 2 * MovingStdDev (Close, 30)) / (4 * MovingStdDev (Close, 30) + 0.0001))
&sec2BOL := 1 + ((&SEC2 - MovingAvg (&SEC2, 30) + 2 * MovingStdDev (&SEC2, 30)) / (4 * MovingStdDev (&SEC2, 30) + 0.0001))
&sec3BOL := 1 + ((&SEC3 - MovingAvg (&SEC3, 30) + 2 * MovingStdDev (&SEC3, 30)) / (4 * MovingStdDev (&SEC3, 30) + 0.0001))
&DIV2 := (&sec2BOL - &sec1BOL) / &sec1BOL * 100
&DIV3 := (&sec3BOL - &sec1BOL) / &sec1BOL * 100
&DIV1 := Max (&DIV2 , &DIV3)

(Crosses Above (MACD (Close, 12, 26, False), MovingAvgX (MACD (Close, 12, 26, False), 9, False))
   And Lowest (MACD (Close, 12, 26, False), 5) < Lowest (MACD (Close, 12, 26, False), 50).5)
   Or (&DIV1 > 30 And (RateOfChange (&SEC2, 1) > 0.5 Or RateOfChange (&SEC3, 1) > 0.5)
   And Close > (1 + 0.7 / 100) * Highest (High, 4))

TTA Sell

&SEC2 := Close Of "$XAU"
&SEC3 := Close Of "$CRBX"
&SEC6 := Close Of "$EUR-JPY"
&sec1BOL := 1 + ((Close - MovingAvg (Close, 30) + 2 * MovingStdDev (Close, 30)) / (4 * MovingStdDev (Close, 30) + 0.0001))
&sec2BOL := 1 + ((&SEC2 - MovingAvg (&SEC2, 30) + 2 * MovingStdDev (&SEC2, 30)) / (4 * MovingStdDev (&SEC2, 30) + 0.0001))
&sec3BOL := 1 + ((&SEC3 - MovingAvg (&SEC3, 30) + 2 * MovingStdDev (&SEC3, 30)) / (4 * MovingStdDev (&SEC3, 30) + 0.0001))
&DIV2 := (&sec2BOL - &sec1BOL) / &sec1BOL * 100
&DIV3 := (&sec3BOL - &sec1BOL) / &sec1BOL * 100
&DIV1 := Min (&DIV2 , &DIV3)

(Crosses Above (MovingAvgX (MACD (Close, 12, 26, False), 9, False), MACD (Close, 12, 26, False))
   And Highest (MACD (Close, 12, 26, False), 5) > Highest (MACD (Close, 12, 26, False), 5).5)
   Or (&DIV1 < -30 And (RateOfChange (&SEC2 , 1) < -0.5 Or RateOfChange (&SEC3 , 1) < -0.5)
   And Close < (1 - 0.7 / 100) * Highest (High , 4)) { Negative Divergence } Or (&DIV1 < 0
   And RateOfChange (&SEC6 , 2) < -1 And Close < (1 - .7 / 100) * Highest (High , 4)
   And MovingAvg (&SEC6 , 40) < MovingAvg (&SEC6 , 40).1) { Carry trade liquidation }

TTA Sell Short

&SEC2 := Close Of "$XAU"
&SEC3 := Close Of "$CRBX"
&SEC5 := 100 - Close Of "YB-057"
&sec1BOL := 1 + ((Close - MovingAvg (Close , 30) + 2 * MovingStdDev (Close , 30)) / (4 * MovingStdDev (Close , 30) + 0.0001))
&sec2BOL := 1 + ((&SEC2 - MovingAvg (&SEC2 , 30) + 2 * MovingStdDev (&SEC2 , 30)) / (4 * MovingStdDev (&SEC2 , 30) + 0.0001))
&sec3BOL := 1 + ((&SEC3 - MovingAvg (&SEC3 , 30) + 2 * MovingStdDev (&SEC3 , 30)) / (4 * MovingStdDev (&SEC3 , 30) + 0.0001))
&DIV2 := (&sec2BOL - &sec1BOL) / &sec1BOL * 100
&DIV3 := (&sec3BOL - &sec1BOL) / &sec1BOL * 100
&DIV1 := Max (&DIV2 , &DIV3)

(Lowest (&DIV1 , 3) < -10 And &DIV1 > &DIV1.1 And RateOfChange (Close , 2) < 0
   And Close < (1 - .7 / 100) * Highest (High , 4) And MovingAvg (&SEC5 , 40) < MovingAvg (&SEC5 , 40).1)
   Or (&DIV1 < -20 And &DIV2 + &DIV3 < -40 And &DIV1 > &DIV1.1 And Close < Close.1
   And Close < (1 - .7 / 100) * Highest (High , 4)) Or (Crosses Above (MovingAvg (Close , 50) , MovingAvg (Close , 15))
   And MovingAvg (&SEC5 , 40) < MovingAvg (&SEC5 , 40).1)
Creating the chart
Go to the chart settings window by clicking on the chart and typing "E" on the keyboard. Click on the "Add" button at the bottom and select "Add Comparison Symbol." Type "YC-057," click OK then select "New Pane." Repeat these steps for YB-057. Then click and drag YB-057 into the same pane as YC-057. Repeat the steps for $Eur/Jpy, selecting "Overlay" instead of "New Pane."
Click on the "Add" button and select Indicator-> "Add Indicator to New Pane." Find the "Tta BB divergence" in the list and click the Add button. Click on "Price" to highlight and click on the Add button. Select "Add HighlightBars to Selected Indicator." Select "Tta Buy" from the list and click on the Add button.
Highlight the Tta Buy in the chart settings window and change it to Type: Highlight Marker (Figure 12). Change it to the icon and color you wish to use.S ee Figure 13 for a sample chart.
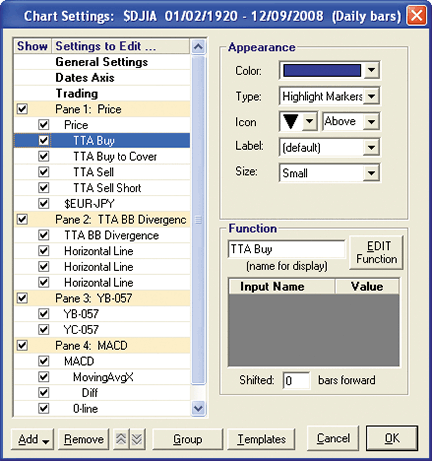
FIGURE 12: TRADE NAVIGATOR, Aud intermarket system, CHART SETTINGS WINDOW. To set up the chart, highlight the Tta Buy in the chart settings window and change it to Type: Highlight Marker. Change it to the icon and color you wish to use.
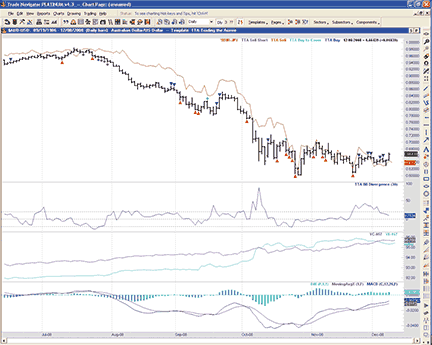
FIGURE 13: TRADE NAVIGATOR, Aud intermarket system. Here is a sample chart of Markos Katsanos� Aussie system in Trade Navigator.
BACK TO LIST
NEOTICKER: TRADING THE AUSSIE
In "Trading The Aussie," author Markos Katsanos presents an indicator and a trading system. These can be implemented in NeoTicker using the NeoTicker formula language.
First, we will present code for the Bollinger band divergence indicator. This indicator is named "Tasc BB divergence" (Listing 1). There is a major difference between the Meta�Stock code given in the sidebar in Katsanos' article and in the NeoTicker code given below. In NeoTicker, the symbol is not loaded within the indicator code. Instead, this indicator is a two-links indicator, which means this indicator requires two data series to return correct results.
Next, we will provide code for the trading system based on research presented in the article. This indicator is named "Tasc BB divergence system" (Listing 2). Again, symbol loading is not coded within the body of the indicator; this makes it easier to change symbols when testing the system. I have also broken up the buy/sell conditions into multiple condition statements to make this formula code more readable.
 LISTING 1
$D1 := choose(param1 < 1, 1, param1 > 200, 200, param1);
$Sec1BOL := 1+(data1-average(data1, $D1)+2*stddev(data1,$D1))/
              (4*stddev(data1,$D1)+0.0001);
$Sec2BOL := 1+(data1-average(data2, $D1)+2*stddev(data2,$D1))/
              (4*stddev(data2,$D1)+0.0001);
plot1 := ($Sec2BOL-$Sec1BOL)/$Sec1BOL*100;
success1 := barsnum>$D1;

LISTING 2
$D1 := choose(param1<1, 1, param1>200, 200, param1);
$Sec1BOL := 1+((c-average(data1,$D1)+2*stddev(data1,$D1))/
               (4*stddev(data1,$D1)+0.0001));
$Sec2BOL := 1+((c-average(data2,$D1)+2*stddev(data2,$D1))/
               (4*stddev(data2,$D1)+0.0001));
$Sec3BOL := 1+((c-average(data3,$D1)+2*stddev(data3,$D1))/
               (4*stddev(data3,$D1)+0.0001));
$DIV2 := ($Sec2BOL-$Sec1BOL)/$Sec1BOL*100;
$DIV3 := ($Sec3BOL-$Sec1BOL)/$Sec1BOL*100;
MaxDIV1 := maxlist($DIV2,$DIV3);
MinDIV1 := minlist($DIV2,$DIV3);
$LongCond1 := (hhv(MaxDIV1,3)>10) and (MaxDIV1<MaxDIV1(1)) and
              (ROC(data1,2)>0) and (data1>(1+0.7/100)*llv(l,4)) and
              ((average(data4,40)>average(1,data4,40)) or
               (average(data5,40)>average(1,data5,40)));
$LongCond2 := (MaxDIV1>40) and (($DIV2+$DIV3)>80) and (MaxDIV1<MaxDIV1(1)) and
              (data1>data1(1)) and (data1>(1+0.7/100)*llv(l,4));
$LongCond3 := (xabove(average(data1,15),average(data1,50))>0) and
              (average(data5,40) > average(1,data5,40));
$LongExit1 := (xbelow(qc_MACD(data1,12,26,"No",9),qc_MACD.plot2(data1,12,26,"No",9))>0) and
              (hhv(qc_MACD(data1,12,26,"No",9),5)>hhv(5,qc_MACD(data1,12,26,"No",9),5));
$LongExit2 := (MinDIV1<-30) and ((roc(data2,1)<-0.5) or (roc(data3,1)<-0.5)) and
              (data1<(1-0.7/100)*hhv(h,4));
$LongExit3 := (MinDIV1<0) and (roc(data6,2)<-1) and
              (data1<(1+0.7/100)*hhv(h,4)) and
              (average(data6,40)<average(1,data6,40));
$ShortCond1 := (llv(MaxDIV1,3)<-10) and (MaxDIV1>MaxDIV1(1)) and
               (roc(data1,2)<0) and (data1<(1-0.7/100)*hhv(h,4)) and
               ((average(data4,40)<average(1,data4,40)) or
               (average(data5,40)<average(1,data5,40)));
$ShortCond2 := (MaxDIV1<-20) and (($DIV2+$DIV3)<-40) and (MaxDIV1>MaxDIV1(1)) and
               (data1<data1(1)) and (data1<(1-0.7/100)*hhv(h,4));
$ShortCond3 := (xbelow(average(data1,15),average(data1,50))>0) and
               (average(data5,40)<average(1,data5,40));
$ShortExit1 := (xabove(qc_MACD(data1,12,26,"No",9),qc_MACD.plot2(data1,12,26,"No",9))>0) and
               (llv(qc_MACD(data1,12,26,"No",9),5)<llv(5,qc_MACD(data1,12,26,"No",9),5));
$ShortExit2 := (MaxDIV1>30) and ((roc(data2,1)>0.5) or (roc(data3,1)>0.5)) and
               (data1>(1+0.7/100)*hhv(h,4));
LongAtMarket($LongCond1>0 or $LongCond2>0 or $LongCond3>0, defaultordersize);
LongExitAtMarket($LongExit1>0 or $LongExit2>0 or $LongExit3>0, defaultordersize);
ShortAtMarket($ShortCond1>0 or $ShortCond2>0 or $ShortCond3>0, defaultordersize);
ShortExitAtMarket($ShortExit1>0 or $ShortExit2>0, defaultordersize);
plot1 := currentequity;
Downloadable versions of both indicators will be available from the NeoTicker blog site (https://blog.neoticker.com).
BACK TO LIST
NINJATRADER: MULTIPLE INSTRUMENTS IN A STRATEGY
NinjaTrader strategies support any combination of multiple instruments and time frames in a single strategy. Events are triggered for each individual bar series added to a strategy. In this month's reference sample, we have included a basic strategy that demonstrates the use of multiple instruments in a strategy. The strategy can be downloaded at www.ninjatrader.com/SC/February2009SC.zip.
Once it's downloaded, from within the NinjaTrader Control Center window, select the menu File > Utilities > Import NinjaScript and select the downloaded file. This strategy is for NinjaTrader version 6.5 or greater.
You can review the strategy's source code by selecting the menu Tools > Edit NinjaScript > Strategy from within the NinjaTrader Control Center window and selecting "FebSC."
NinjaScript strategies are compiled Dlls that run native, not interpreted, which provides you with the highest performance possible.
BACK TO LIST
TRADE IDEAS: FINDING OVEREXTENDED MOVES IN PRICE
"There is always plenty of capital for those who can create practical plans for using it." --Napoleon Hill (1883--1970, author of Think And Grow Rich)
For this month's Traders' Tip, we've provided a strategy for which the benefit derives more from when it is used versus what is traded. We discovered this strategy, which was like finding a hidden gem, in a place that most people don't consider: Have you ever thought that some of the better odds in trading could be happening right over the market lunch hour (Est)? Using Trade-Ideas OddsMaker, we found some amazing results right at the time when most people are not paying attention.
The strategy is based on the Trade-Ideas inventory of alerts and filters, and is backtested with trading rules modeled in The OddsMaker.
Here is the strategy based on finding overextended moves in price: We look for stocks making new highs and whose stock price ranges from $5 to $25. We watch for a specific spread situation, where the stocks have at least a 10-cent spread. In addition, the stock's new high must occur with at least a 65-cent rise over the last five minutes to meet our interpretation of the overextended move. The new-high trigger is our indication to throw out offers to go short. The results speak for themselves for the three weeks ending 12/09/2008: a 76% success rate, where average winners are almost three times as large as average losers.
FIGURE 14: TRADE IDEAS, SET-UP. Shown here is the combination of alerts and filters used to create the "Short -- Lunch-time fade" strategy.
 Provided by:
Trade Ideas (copyright (c) Trade Ideas LLC 2008). All rights reserved. For educational
 purposes only.  Remember these are sketches meant to give an idea how to model a
 trading plan. Trade-Ideas.com and all individuals affiliated with this site assume
  no responsibilities for trading and investment results.

Description:  "SHORT - Lunch Time Fade"

Copy this string directly into Trade-Ideas PRO using the "Collaborate" feature
(right-click in any strategy window) (spaces represent an underscore if typing):

https://www.trade-ideas.com/View.php?O=1_1_0&MaxDNbbo=0.01&MaxPrice=25&MaxSpread=100&MaxVol=2000000&MinDUp5=0.65&MinPrice=5&MinSpread=10&MinVol=50000&WN=Lunch+Time+Fade
This strategy also appears on the Trade-Ideas blog at https://marketmovers.blogspot.com/.
Figure 14 shows the configuration of this strategy, where one alert and eight filters are used with the following specific settings:
- New High Alert (of the day)
- Min Price Filter = 5 ($)
- Max Price Filter = 25 ($)
- Min Spread Filter = 10 (pennies)
- Max Spread Filter = 100 (pennies)
- Min Distance from Inside Market Filter = 0.01 (%)
- Min Daily Volume Filter = 50,000 (shares/day)
- Max Daily Volume Filter = 2,000,000 (shares/day)
- Min Up 5 Minute Candle Filter = 0.65 ($)
The definitions of these indicators appear here: https://www.trade-ideas.com/Help.html.
That's the strategy, but what about the trading rules? How should the opportunities that the strategy finds be traded? Here is what The OddsMaker tested for the past three weeks ending 12/09/2008 given the following trade rules:
- On each alert, sell short (price moves down to be a successful trade)
- Buy back the stock if price moves up $1.50
- Otherwise, hold the stocks for no more than 15 minutes after entry
- Start trading 1 hour and 30 minutes after the market open
- Stop new trades three hours before the end of the market close
As we mentioned earlier, The OddsMaker summary provides the evidence of how well this strategy and our trading rules did (Figure 15).
FIGURE 15: TRADE IDEAS, ODDSMAKER SUMMARY. This shows the OddsMaker backtesting configuration for the "Short -- Lunch-time fade" strategy.
The results (last backtested for the three-week period ending 12/09/2008) are shown in Figure 16. You can gain understanding of these backtest results from The OddsMaker by reading the user manual at https://www.trade-ideas.com/OddsMaker/Help.html.
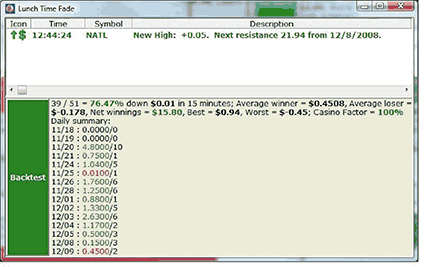
FIGURE 16: TRADE IDEAS, ODDSMAKER RESULTS. Here are the results for the "Short -- Lunch-time fade" strategy.
BACK TO LIST
METASTOCK: TRADING THE AUSSIE (Katsanos Article Code)
The MetaStock code for the intermarket Bollinger band (BB) divergence method from Markos Katsanos' article in this issue, "Trading The Aussie," is below.
This system developed by Markos Katsanos exploits the traditionally strong correlation between the Australian dollar and commodities.
BB Divergence indicator
D1:=Input("BB DAYS " ,1 ,200 ,30 );
SEC2:=Security("C:\Metastock Data\REUTERSINDEX\.XAU",C);
sec1BOL:= 1+((C- Mov(C,D1,S)+2*Stdev(C,D1))/(4*Stdev(C,D1)+.0001));
sec2BOL:=1+((SEC2- Mov(SEC2,D1,S)+2*Stdev(SEC2,D1))/(4*Stdev(SEC2,D1)+.0001));
DIVERG:=(sec2BOL-sec1BOL)/sec1bol*100;
DIVERG
AUD intermarket Bollinger band divergence system
To recreate the tests, click on Enhanced System Tester, click on "New system," and paste in the buy, sell, short, and buy-to-cover code [shown below].
To run the test, click on "New simulation," add securities, and select the Australian dollar (AUD/USD). Then select "Periodicity: Daily." Click on "Next," and select a transaction cost and initial equity of 100,000. Click on "Trade execution," uncheck "Realistic market prices," select "Buy price and sell price at close with no delay," and fill in the slippage of 0.0002 (two pips) per transaction.
Interest rates for the USD and the AUD fluctuated considerably during the test duration, so I had to calculate debit and credit interest manually using historical data from Oanda (https://fxtrade.oanda.com/tools/statistical_information/oanda_interest_rates.shtml).
You will also need to change the first four lines of the code to point to the appropriate folder in your hard drive where the XAU, the CRB index, and 90-day bank bill futures (YBA) are located.
If you wish to replicate the test, keep in mind that for the test to begin producing any signals, the indicators used should be calculated first, and this requires at least 55 extra bars to be loaded.
Buy
SEC2:=Security("C:\Metastock Data\REUTERSINDEX\.XAU",C);
SEC3:=Security("C:\Metastock Data\REUTERSINDEX\.CRB",C);
SEC5:=100-Security("C:\Metastock Data\REUTERSFOREX\@:YBAc1",C);
sec1BOL:= 1+((C Mov(C,30,S)+2*Stdev(C,30))/(4*Stdev(C,30)+.0001));
sec2BOL:=1+((SEC2-mov(SEC2,30,S)+2*Stdev(SEC2,30))/(4*Stdev(SEC2,30)+.0001));
sec3BOL:=1+((SEC3- Mov(SEC3,30,S)+2*Stdev(SEC3,30))/(4*Stdev(SEC3,30)+.0001));
DIV2:=(sec2BOL-sec1BOL)/sec1bol*100;
DIV3:=(sec3BOL-sec1BOL)/sec1bol*100;
DIV1:=MAX(DIV2,DIV3);
(HHV(DIV1,3)>10
   AND DIV1<REF(DIV1,-1) AND ROC(C,2,%)>0 AND C>(1+.7/100)*LLV(L,4)
   AND (MOV(SEC4,40,S)> REF(MOV(SEC4,40,S),-1)
   OR MOV(SEC5,40,S)> REF(MOV(SEC5,40,S),-1)) )
   OR (DIV1>40 AND DIV2+DIV3>80 AND DIV1<REF(DIV1,-1) AND C>REF(C,-1)
   AND C>(1+.7/100)*LLV(L,4) ) OR {MA Crossover}
   (CROSS(MOV(C,15,S),MOV(C,50,S)) AND MOV(SEC5,40,S)> REF(MOV(SEC5,40,S),-1))

Sell
SEC2:=Security("C:\Metastock Data\REUTERSINDEX\.XAU",C);
SEC3:=Security("C:\Metastock Data\REUTERSINDEX\.CRB",C);
SEC5:=100-Security("C:\Metastock Data\REUTERSFOREX\@:YBAc1",C);
SEC6:=Security("C:\Metastock Data\REUTERSFOREX\EURJPY=",C);
sec1BOL:= 1+((C- Mov(C,30,S)+2*Stdev(C,30))/(4*Stdev(C,30)+.0001));
sec2BOL:=1+((SEC2- Mov(SEC2,30,S)+2*Stdev(SEC2,30))/(4*Stdev(SEC2,30)+.0001));
sec3BOL:=1+((SEC3- Mov(SEC3,30,S)+2*Stdev(SEC3,30))/(4*Stdev(SEC3,30)+.0001));
DIV2:=(sec2BOL-sec1BOL)/sec1bol*100;
DIV3:=(sec3BOL-sec1BOL)/sec1bol*100;
DIV1:=MIN(DIV2,DIV3);
(CROSS(MOV(MACD(),9,E),MACD()) AND HHV(MACD(),5)>REF(HHV(MACD(),50),-5))
   OR (DIV1<-30 AND (ROC(SEC2,1,%)<-.5 OR ROC(SEC3,1,%)<-.5)
   AND C<(1-.7/100)*HHV(H,4)) {Negative Divergence}
   OR ( DIV1<0 AND ROC(SEC6,2,%)<-1 AND C<(1-.7/100)*HHV(H,4)
   AND MOV(SEC6,40,S)<REF(MOV(SEC6,40,S),-1)) {Carry trade liquidation}

Sell short
SEC2:=Security("C:\Metastock Data\REUTERSINDEX\.XAU",C);
SEC3:=Security("C:\Metastock Data\REUTERSINDEX\.CRB",C);
SEC5:=100-Security("C:\Metastock Data\REUTERSFOREX\@:YBAc1",C);
sec1BOL:= 1+((C- Mov(C,30,S)+2*Stdev(C,30))/(4*Stdev(C,30)+.0001));
sec2BOL:=1+((SEC2- Mov(SEC2,30,S)+2*Stdev(SEC2,30))/(4*Stdev(SEC2,30)+.0001));
sec3BOL:=1+((SEC3- Mov(SEC3,30,S)+2*Stdev(SEC3,30))/(4*Stdev(SEC3,30)+.0001));
DIV2:=(sec2BOL-sec1BOL)/sec1bol*100;
DIV3:=(sec3BOL-sec1BOL)/sec1bol*100;
DIV1:=MAX(DIV2,DIV3);
(LLV(DIV1,3)<-10 AND DIV1>REF(DIV1,-1) AND ROC(C,2,%)<0
   AND C<(1-.7/100)*HHV(H,4) AND (MOV(SEC4,40,S)<REF(MOV(SEC4,40,S),-1)
   OR MOV(SEC5,40,S)< REF(MOV(SEC4,40,S),-1))) OR (DIV1<-20 AND DIV2+DIV3<-40
   AND DIV1>REF(DIV1,-1) AND C<REF(C,-1) AND C<(1-.7/100)*HHV(H,4))
   OR (CROSS(MOV(C,50,S),MOV(C,15,S)) AND MOV(SEC5,40,S)< REF(MOV(SEC5,40,S),-1))


Buy to cover
SEC2:=Security("C:\Metastock Data\REUTERSINDEX\.XAU",C);
SEC3:=Security("C:\Metastock Data\REUTERSINDEX\.CRB",C);
sec1BOL:= 1+((C- Mov(C,30,S)+2*Stdev(C,30))/(4*Stdev(C,30)+.0001));
sec2BOL:=1+((SEC2- Mov(SEC2,30,S)+2*Stdev(SEC2,30))/(4*Stdev(SEC2,30)+.0001));
sec3BOL:=1+((SEC3- Mov(SEC3,30,S)+2*Stdev(SEC3,30))/(4*Stdev(SEC3,30)+.0001));
DIV2:=(sec2BOL-sec1BOL)/sec1bol*100;
DIV3:=(sec3BOL-sec1BOL)/sec1bol*100;
DIV1:=MAX(DIV2,DIV3);
(CROSS(MACD(),MOV(MACD(),9,E)) AND LLV(MACD(),5)<REF(LLV(MACD(),50),-5))
   OR (DIV1>30 AND (ROC(SEC2,1,%)>.5 OR ROC(SEC3,1,%)>.5) AND C>(1+.7/100)*HHV(H,4))
AUD Expert Advisor
To avoid the tedious task of running the test every day to check for whether there are any new signals, you can create an expert advisor and attach it to the AUD/USD chart.
To create the expert advisor, click on the appropriate icon and then click on "New," and fill in an appropriate name (for example, "AUD Intermarket System") in the name field and fill in the following in the Notes field: "See article: Trading The Australian Dollar by Markos Katsanos published in the February 2009 issue of TAS&C." Then click on ‘symbols," select the appropriate action (that is, "Buy"), and fill in the same code that you used for the test described above. Then click on "Graphic" and select an appropriate graphic (for example, green arrows below the price plot). The same procedure should be repeated for the sell, short, and buy-to-cover code.
BACK TO LIST